|
|
12
|
|
This post was updated on .
Hello to everyone, I am a long time lurker and first time poster. I purchased this 81 CB750C for 1k about a month ago and have been snooping through builds looking for ideas. I am new to riding so I am still getting my feet wet with the bike and what I like/dislike about the style. The bike was a weekend/summer rider for it's life and has 10k miles on it currently.
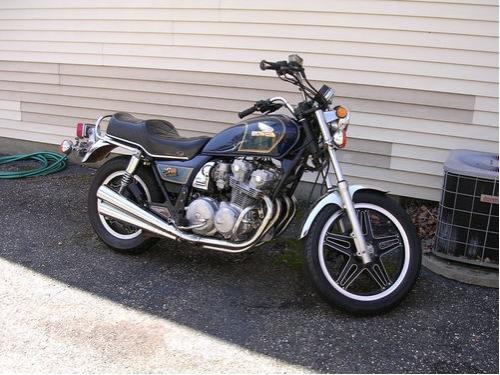 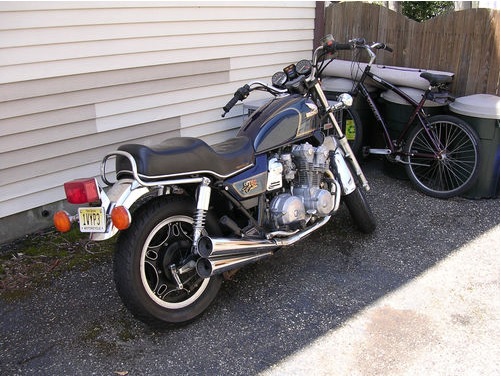 I don't plan on going cafe racer or keeping it stock but something in between. I do quite a bit of pinstriping on cars as a hobby so I am looking to include some of that detail on the tank and replacing the side panels with metal ones that I am fabricating.
So far I have done the typical replacements; Iridium Spark Plugs, Gran Turismo Grips from ( http://www.cb750supply.com/products/2/chassis-brakes/62/handlebar-grips), oil change, and a seafoam treatment.
I also replaced the battery with an AGM from X2 and ran into my first bike issue....bum bum bum the charging system. Rotor test shows fine with 4.7ohms and stator shows good with .7ohms between lines. Harness looks good but testing battery at 3-5k RPMS shows less than 13.5 volts coming in.
After reviewing the multiple threads I believe it is the regulator/rectifier. I did the FSM test but I either did it is wrong or the thing is dead because when I tested the yellow to red/white or green I got nothing in resistance or continuity.
I took the bike out for a 30 minute ride and managed to not stall it. Left with a battery charge of 12.89 came back and tested 12.78 I would say I kept it above 3krpm for at least 90% of the ride.
I am going to try to replace the regulator rectifier and came across a post from another forum I am going to try to put together my own.
Going to use:
http://www.amazon.com/80-Amp-3-Phase-Bridge-Rectifier/dp/B004FGIVN8/ref=pd_bxgy_hi_img_y/190-9959426-4055054and
http://www.oreillyauto.com/site/c/detail/BWD0/PT173/01539.oap?year=1979&make=Dodge&model=W150&vi=1099863&ck=Search_01539_1099863_2036&pt=01539&ppt=C0189and
http://www.oreillyauto.com/site/c/detail/MPI0/2VR1.oap?year=1979&make=Dodge&model=W150&vi=1099863&ck=Search_vr295_1099863_3934&keyword=vr295I guess this will be the first interesting part of the build. Getting it in working order before doing some of the fun things. For those who are going to recommend the guy from Oregon Motorcycle parts is out of the DOHC ones and said it would be at least three weeks. I figure I can try to give back some by engineering the above regulator/rectifier and posting a how-to if it works.
Or cry when it doesn't.
|
|
|
Welcome to the forum. Nice looking bike. Your plans to customize it with paint sound good. Try, if you haven't already, getting some contact cleaner and cleaning all the connectors in the charging system from the sator to the battery and rectifier. 13.5 isn't too bad, you may be able to get it up to 14 with a good cleaning. The charging systems on these bikes is weak at best.
89 VN 750A - Given to son-in-law
79 CB 750K-sold 3 May 21
78 CB 750K
77 CB 750K
77 GL 1000 x 2
77 CB 550F
Holton, KS, US
|
|
Administrator
|
I can't wait to see how you build the regulator. Welcome aboard.
TOOLS
Life is not about the number of breaths, you take, but the moments that take your breath away.
I don't have an anger problem. I have an idiot problem. Hank Hill
Never confuse education for intelligence.
Happiness is a belt fed weapon.
I just can't imagine what could go wrong.
No fire? No explosions? So whats the point of your story?
Those who are too smart to engage in politics are punished by being governed by those who are dumber. ~Plato
It couldn't be done, but the darn fool didn't know it, and did it anyway.
We all got problems. Ksharp
I like vintage bikes because they take me away from the clutter of technology that I work with everyday and back to a simpler time of mechanical elegance and simplicity.. "ninadm"
Darkwing Duck: The worst part of public transportation is the Public.
"That is awesome shit there" Re-Run
"Fear nothing, attack everything" Eric Berry
" Oh, you read that on the internet? Clearly it IS a massive problem. Of course it CAN’t be normal operation."
1976 CB 750-A X 2
1977 CB 750-A X 4
1977 CB 750-K
1976 CB 750 F
1981 CB 750
1966 Kawasaki SG 250
1981 KZ 750 LTD
1973 CB 350
1979 CM 185 Twinstar
1982 Honda XL 80
South of Eden (Kansas City MO)
|
|
|
I bought some DeoxIT from the local Ratshack and was going to give that a try as well. To clarify what I had said the charge on the battery when at 3-5k RPM was below 13.5 to the tune of about 12.4-.5. I would have assumed though that I would lose more charge during my 30 minute ride (12.89 -12.78) .11 then that if it was charging so low.
The initial problem was almost certainly me being a sucky driver and stalling the bike 4-5 times a ride. Now that I have gotten past that I can see it is a slow decline in charge. I am going to try the contact cleaner and see if that gets me over the hump on a ride tonight.
Either way Tools will get his wish because those parts for the homemade regulator are on order. Unfortunately since I just got under contract for a house I wont likely get to do any major work until July.
|
|
|
Updated the build name to reflect my paint scheme. I think I am going to use this emblem as the starting point on the tank. I will replace the Raised Honda Custom Badge with this on a paint scheme:
 I am thinking a black frame still or perhaps a very dark red. Then going with red pinstriping with some black touches on an all white tank. Since I have to wait until July to really take her apart I figured I could mock up the paint scheme.
Speaking of waiting until July, I am also working on a browsable version of the DOHC FSM. I am redoing it in PDF but with links and considering adding a useful index with hyperlinks.
|
|
|
Hey... THAT is what my bike looked like at one point before I got it. CONGRATS.
Welcome to the forum Manual, seems like you're quite the "DIYer" Glad to have you aboard!
81 Honda CB750C - Current Project
67 BSA Spitfire MkIII - Next Up (Full Resto)
81 Honda GL1100 - Bob / Cafe´
80 Suzuki GS750L - Bratstyle
72 Honda CB450K5 - Basket Case
73 Honda CB350F Cafe' (Gone but not forgotten)
Don't wait for opportunity to knock... kick the door down and drag the old harlot in!
|
|
|
That particular bike has a known issue with the spring-loaded carbon brushes in the alternator. I would suggest checking those while you wait for the rectifier/regulator parts to come in...
With regards to the rectifier/regulator you plan to put together, it should work. The rectifier you ordered is a three-phase unit, which is exactly what the alternator puts out: three yellow wires, are all pumping AC, in three phases, less than 700 Watts, whereas a car alternator pumps out 1 kW, maybe more, AC voltage is less than 30 VAC RMS and the rectifier can handle up to 1,000 VAC -- check! The regulator is for 12 Volt/negative ground, automotive systems (your bike is a negative ground system, also), which are capable of handling many, many more amps of current, than your M/C alternator could ever dream of pumping out -- check! Your rectifier will be capable of handling 33x the voltage, and 8x the amperage of what you will ask it to handle -- extremely good safety margins... Just be sure to wire them properly, and make certain the ground connections are good, using 12 GA braided wire (easier to work with compared to solid) to handle the current. It's OK to crimp on connectors (use a good crimper!), but it would be far better to also solder them -- use electrical solder, not pipe solder. Liquid Tape is really handy, as well: just paint it on, let it dry completely, then add a 2nd/3rd coat to be sure to cover everything up; water-proof's the connection, as well, preventing corrosion. Cheers!
1979 CB750K (sold, 2012, but not forgotten)
1983 Kawasaki 440 LTD Belt Drive (sold, 2011)
1993 Kawasaki Voyager XII
|
|
|
I noticed that when I was scouring your thread. I like the way your build has been coming along so I have been stealing some painting ideas and schemes. Been really helpful with you having the exact same bike.
|
|
|
sgtslag wrote
That particular bike has a known issue with the spring-loaded carbon brushes in the alternator. I would suggest checking those while you wait for the rectifier/regulator parts to come in...
I have been considering just replacing those brushes since they are cheap. I have found several models to replace it with but do you know of a "superior" one to replace with that is better then one that will just plug and play?
I appreciate the rundown on the regulator setup. I was curious as to what wiring gauge to use, so cheers for helping me with that detail. I could have bought a replacement but I think fabricating this piece will allow DOHC owners to replace the one component that goes bad and save some serious cash. The whole solution could be less than 60$ and last a lifetime.
|
|
|
My Dad had that same bike, had an issue with the brushes. I don't know what substitution, if any, would work. I would just stick with the OEM part.
You are correct: being able to replace the pieces, singularly, can save a chunk of change! I never looked into it before. At $60 for the whole unit, piece-meal, it is considerably less money than the OEM replacement, or an after-market piece. This set-up will work for virtually any bike, any year (bikes never filter the DC output, using capacitors to smooth the ripple voltage, other than what the Regulator can do by itself). Thanks for your research into this. I plan on filing it away for future reference -- I may even post it on other bike forums, giving you credit due. It is just too valuable not to share. Cheers!

1979 CB750K (sold, 2012, but not forgotten)
1983 Kawasaki 440 LTD Belt Drive (sold, 2011)
1993 Kawasaki Voyager XII
|
|
|
Have at it, let me know if you see something you like or have any questions.
81 Honda CB750C - Current Project
67 BSA Spitfire MkIII - Next Up (Full Resto)
81 Honda GL1100 - Bob / Cafe´
80 Suzuki GS750L - Bratstyle
72 Honda CB450K5 - Basket Case
73 Honda CB350F Cafe' (Gone but not forgotten)
Don't wait for opportunity to knock... kick the door down and drag the old harlot in!
|
|
|
Well I took your advice sgtslag and dove into the brushes for the first time. Let me preface everything with that I am a novice mechanic (ie can change my cars oil) and that the things I am doing make sense to me as I do them but may be wrong so feel free to correct anything that I overlook.
So I crack the alternator open and test the rotor again, negative inside positive outside. I get 4.7 Ohms every spot I test.
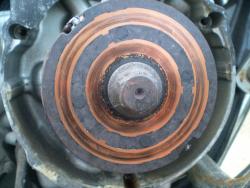 I cleaned this plate off with DeoxIT D then Gold. Wiped dry then moved onto the brushes. These little peckers took some arm strength to get off and the screws to them were heavily corroded.
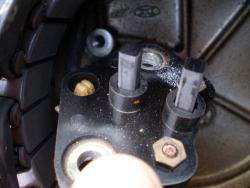 Well I wire brushed the moutning screws cleaned and then moved on to the brushes. The backs of them were stuck bad too and the screws were highly corroded as well. I wire brushed then DeoxIT'd the brush plates and the circle ends attaching to them. Continuity test the brushes and they are A'ok.
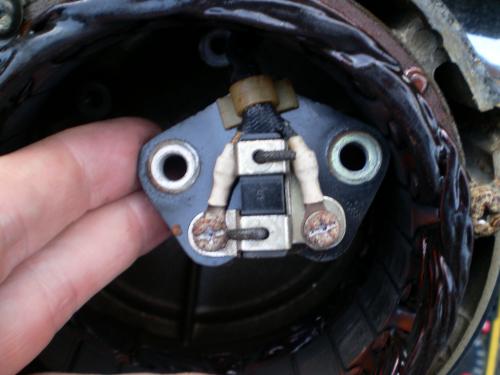 The result was pretty clean but I couldnt help but think about all the corrosion inside and what the heck could be the cause. I was closing the plate back up and notice more corrosion on the bottom.
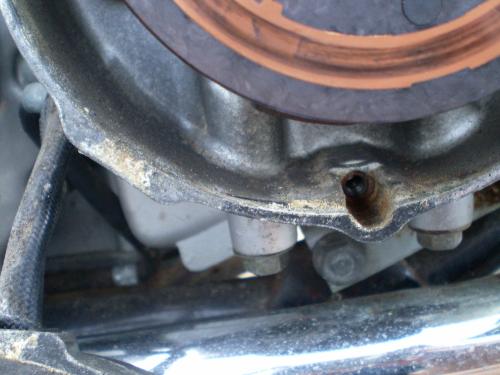 I looked closely and noticed the gasket? that goes around the alternator when you closed it was torn and some missing! So I will have to track that down, I imagine the first ride I take it on that is wet would cause more issues.
Finally, I noticed some cracking on the tires.
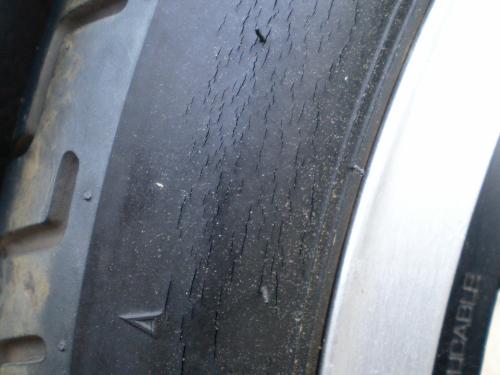 I remember a post from TOOLs talking about chaning the tires but I am not sure if this is typical motorcycle wear? Or if this means replace asap. If it were a car I would drive on it because the cracks are very shallow and nothing is showing inside. I obviously have no idea since it is a bike and my first one at that.
|
|
|
There is a date code on the sidewalls of the tires. The first two digits are the week, then the year, if I remember correctly. Anyway, tires need to be replaced after three years, regardless of tread, or condition: rubber hardens, over time; you only have two tires to keep the shiny side up...
Here is a site with rider's reviews on many different tires: Tire Reviews. My personal favorite, on three different bikes, are the Pirelli MT66 Route tires. I rode them on my 1983 Kawasaki 440 LTD, my 1979 Honda CB750K, and my 1993 Kawasaki Voyager XII touring bike. They're superb in rain (rode 60 MPH, leaning into curves, in a moderate rain -- glued to the road...), wind, ignore tar snakes and grated bridges. They run around $100/$120 for front/rear for your bike. They are the only tires I will ride on, and I ride two-up, 98% of the time, usually touring with a heavy load, in wet and dry conditions. We've got around 7k miles on our current set, and they have at least one more season (3k-5k miles) left in them. Cheers!
1979 CB750K (sold, 2012, but not forgotten)
1983 Kawasaki 440 LTD Belt Drive (sold, 2011)
1993 Kawasaki Voyager XII
|
|
Administrator
|
About those tires,they look pretty bad. If you were to ease that bike through town just to get to a shop to have the tires replaced I wouldn't blame you. Other than that I'd replace them ASAP. New tires aren't cheap,but it's a lot cheaper than dumping a bike. Parts damaged + you damaged=not cool. Be safe bud.
|
|
|
Thanks Shiny, always glad to take advice from a fellow Virginian (Stafford). My motorcycle budget has entered sequestration since I went under contract for a home so I opted for Shinko's instead.
I have a few non-sexy projects going for the bike at the moment. First, my Frankenstein Regulator/Rectifier components have arrived and I have started game-planning their locations. Second I am working through an LED conversion to lower my power draw.
I just need some decent weather to do some work (no garage yet).
|
|
|
Going to ask a favor...
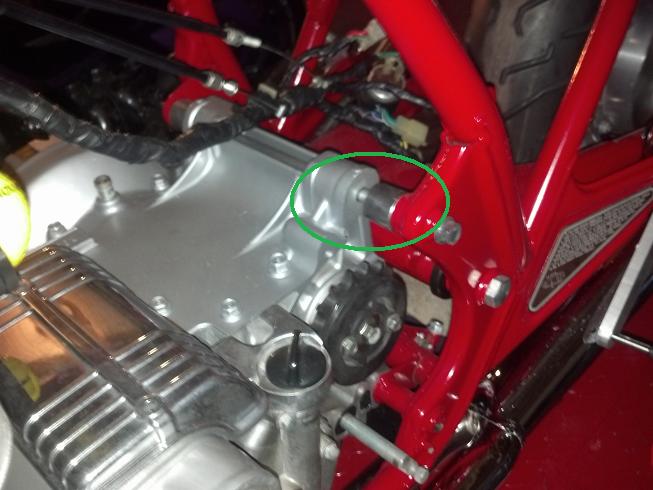
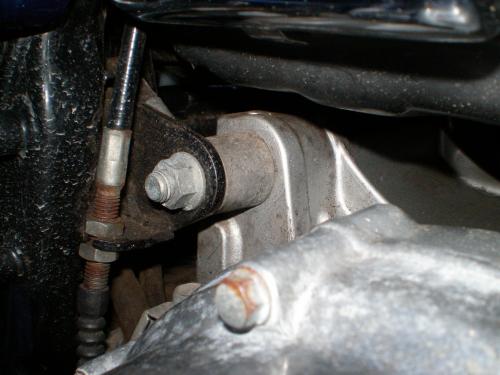
Since I bought my bike in a box, I am a little puzzeled on the motor mount spacers that are on the top rear engine mounting through-bolt. Since yours is the same year / model and stock I am hoping you could post a pic of what it originally came with.
I have done quite a bit of research on my own but have not found a good example of what it should be. I have seen ones on e-bay that are exactly what I have...
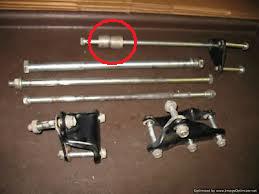 Yet, as you can see in this pic, I have a gap on the left side. Sure, I could take it up with a stack of washers, or pick up some round stock and machine a proper spacer, but what does your bike have here on the left side ?
81 Honda CB750C - Current Project
67 BSA Spitfire MkIII - Next Up (Full Resto)
81 Honda GL1100 - Bob / Cafe´
80 Suzuki GS750L - Bratstyle
72 Honda CB450K5 - Basket Case
73 Honda CB350F Cafe' (Gone but not forgotten)
Don't wait for opportunity to knock... kick the door down and drag the old harlot in!
|
|
|
Sorry I didn't see this earlier Hoosier, I was out furiously trying to get the bike in shape to do Rolling Thunder here tomorrow. Sadly, the charging systems just isn't going to play ball =(
Ok so it's darker here I went out to grab the photos.
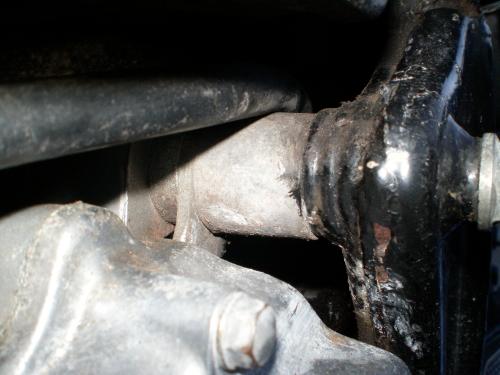 This looks like yours but covers the whole cap. I'm no expert to me it feels like a solid aluminum piece going across that gap. Here's another shot:
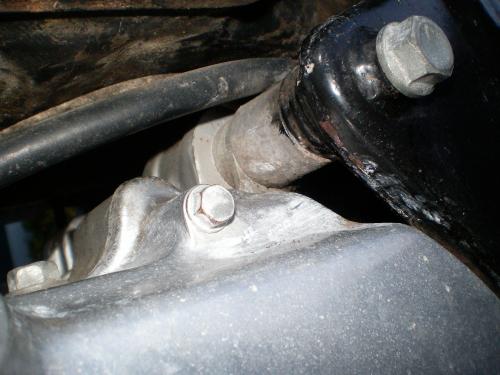 I tried to measure it as well and locking my tape measure on the spacer far side I got about 1 1/8"
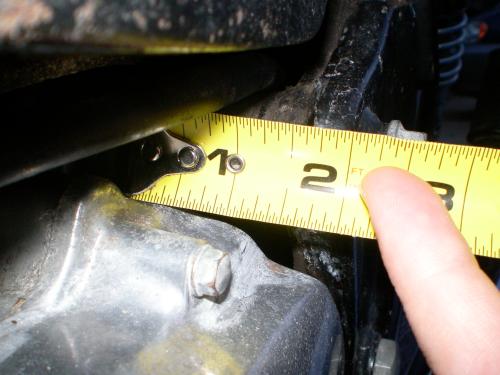 Also, in case you wanted a comparison this is the right side. I forgot to measure it but I can get that for you if you want it as well.
|
|
|
Ok so I have my regulator and rectifier for the build and I was game-planning placement of the new regulator. I did some measuring the the new regulator just happens to be a perfect fit on the two top screws to the place where the existing reg/rec combo sits!
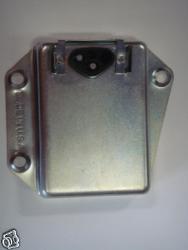 The best of this case is it does not have a grounding wire but is case grounded. The thing I don't know and would like some input on is if the existing mount point on the battery case is frame grounded or does the battery case sit on some rubber mounts that I can't see? I would like this to just be plug-n-play but if this isn't a ground point some more "creative things" will have to happen.
I am still waiting on a pre-made wiring harness for the regulator before slapping this together.
|
|
|
The Regulator is designed for the metal case to be connected to the chassis -- which is negative/ground on the battery. If the mounting screws go into the bike's chassis, this will connect the Regulator's casing to the battery's negative pole. No extra grounding wire will be needed. Apply some dielectric grease on all of the connectors, and the mounting screws: it will seal out moisture, and it will allow you to turn the screws even tighter -- don't over-tighten, though! Cheers!
1979 CB750K (sold, 2012, but not forgotten)
1983 Kawasaki 440 LTD Belt Drive (sold, 2011)
1993 Kawasaki Voyager XII
|
|
|
Manual, your picture helped a lot... unfortunatly.
I see what looks like an ear and an additional spacer that I am missing. <GROAN>  This is proving to be a pain as I have yet to come across in the microfisch, heck I can't even find the rear sprocet cover in the factory parts listings. I did find a pic of it in the factory service manual, appears that is a "half moon" shaped plate surounding the sprocket that is missing on mine.
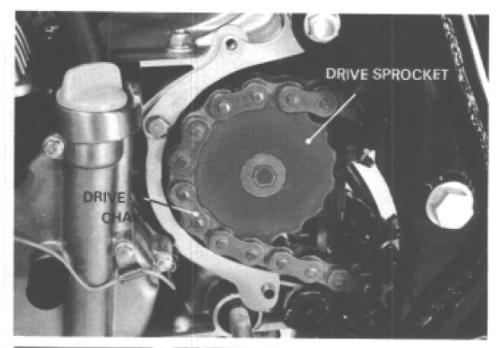 Maybe while you are rewriting the manual, you can add more detail on this piece!  Thanks for your help, I am off to rummage through my remaining parts boxes and work benches, heck might end up having to clean the shop!
81 Honda CB750C - Current Project
67 BSA Spitfire MkIII - Next Up (Full Resto)
81 Honda GL1100 - Bob / Cafe´
80 Suzuki GS750L - Bratstyle
72 Honda CB450K5 - Basket Case
73 Honda CB350F Cafe' (Gone but not forgotten)
Don't wait for opportunity to knock... kick the door down and drag the old harlot in!
|
12
|


