I've seen some people working on clutches here lately and asking some questions about it. While it is a very easy job to do,sometimes it can be intimidating diving head first in to the unknown. Hopefully this will help take some of the mystery out of the situation.
If I overlooked or left out anything feel free to correct me.Or add tips and tricks that you might know. I'm definitely not a pro mechainc,just showing how I do it.
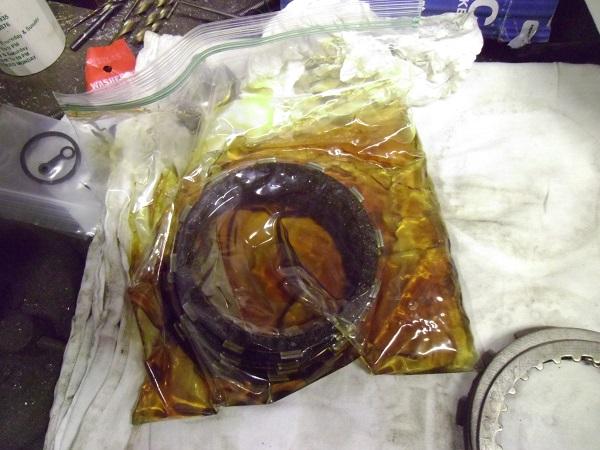
First things first! Soak your now friction discs in oil (whatever you're using in your engine)and let them set for 24 hours. I don't know if it needs a full 24 hours or not,but that's the rule of thumb.I use a large freezer bag for this. It require much less oil than using a large bowl or whatnot.
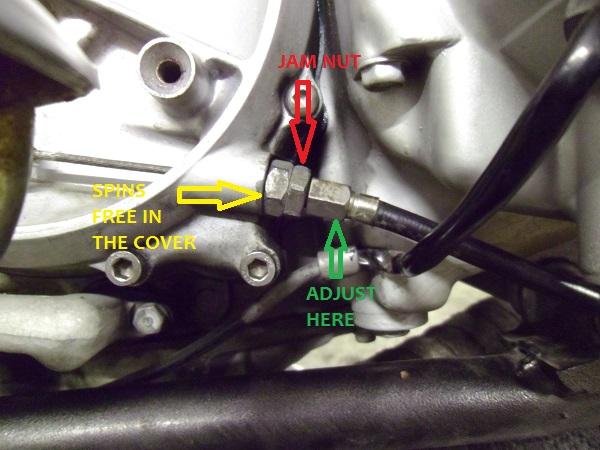
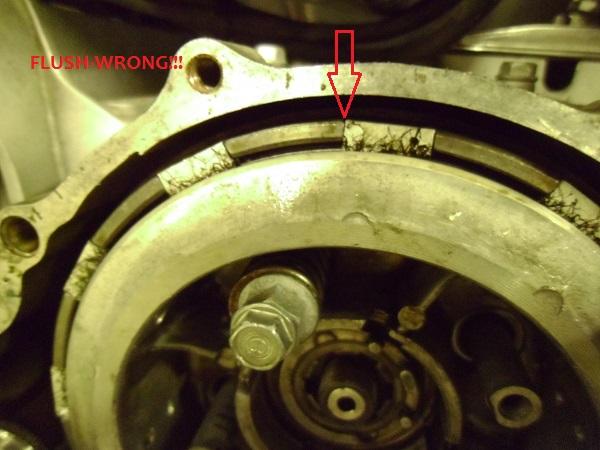
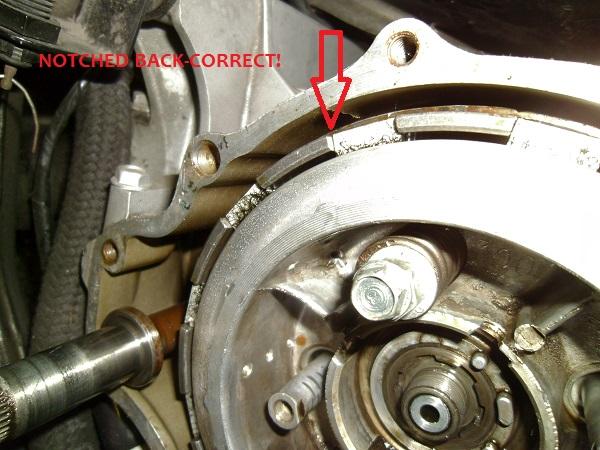
First off,to get to the clutch just lean the bike over on the kickstand and remove the covers. No need to drain the oil to do this. You won't lose any at all. And it also helps to have the bike in first gear before you get started since it will hold the output shaft in place while removing the retaining nut on the clutch.
Remove the kick starter and the outer dust cover first. This will get you to the throwout adjustment nut. No need to loosen any of that yet. Just go ahead and remove the next cover with all of this still intact.
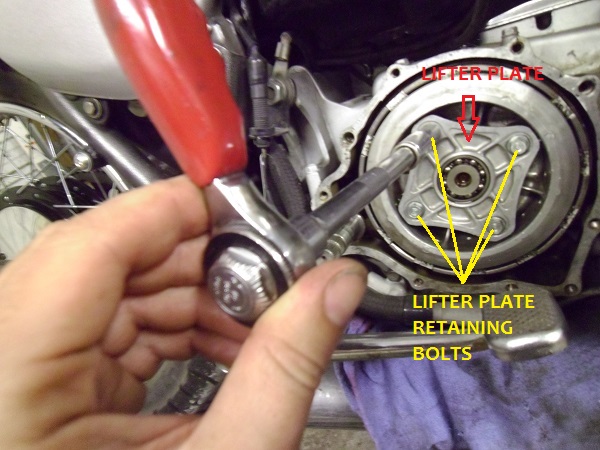
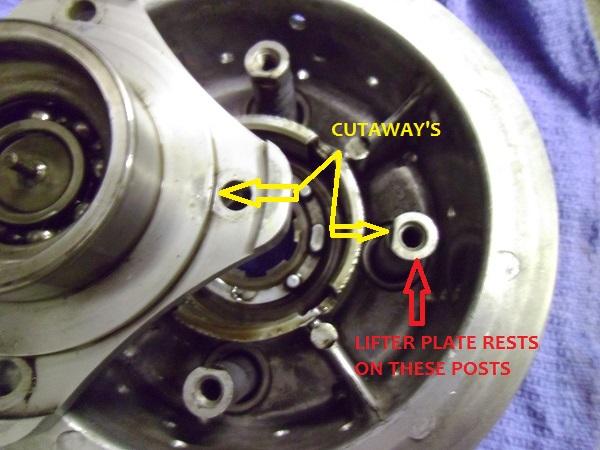
Once inside you will see this. First thing to remove is the lifter plate.There are a lot of horror stories on the internet about how easy it is to crack this lifter plate.
DO NOT let those stories scare you. There is a
100% proven way to deal with the lifter plate to prevent any chance of damaging it. More on that later. But for now,when removing the lifter plate
DO NOT remove the bolts one at a time.This is one cause of the cracking! Go ahead and break all four of them loose,then proceed to back them out 1/2 turn at a time until the lifter plate becomes slack. The plate will become completely slack before the bolts are all the way removed,so need to worry about anything flying out under tension.
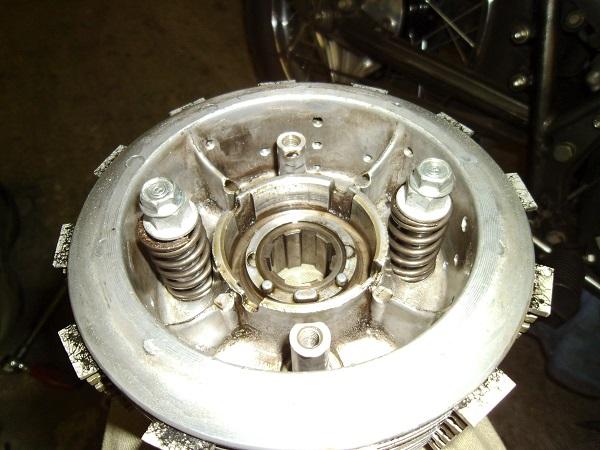
Remove the lifter plate and the clutch springs.Now if you temporarily reinstall two of the clutch springs with spacers( I used two random nuts) you can tighten them just to touching (no tension needed) it will keep everything from flopping around on you while you do the rest of this.
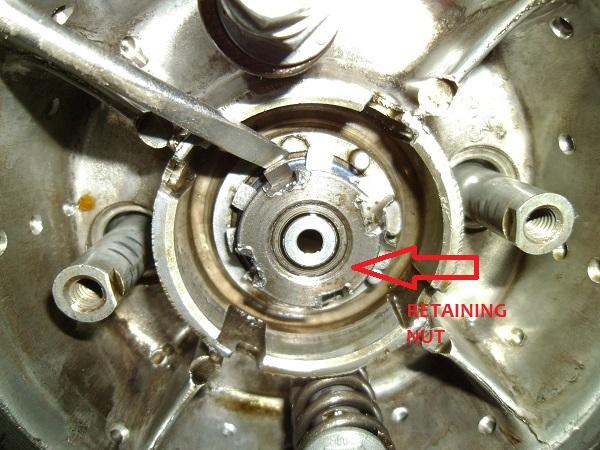
The next thing to remove is the retaining nut. There is a tool you can buy to remove this nut.
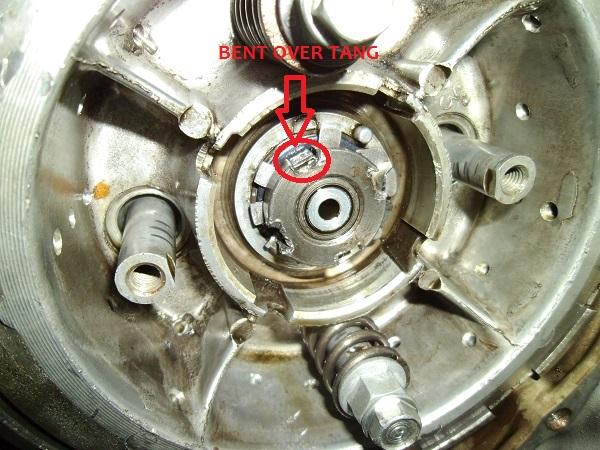
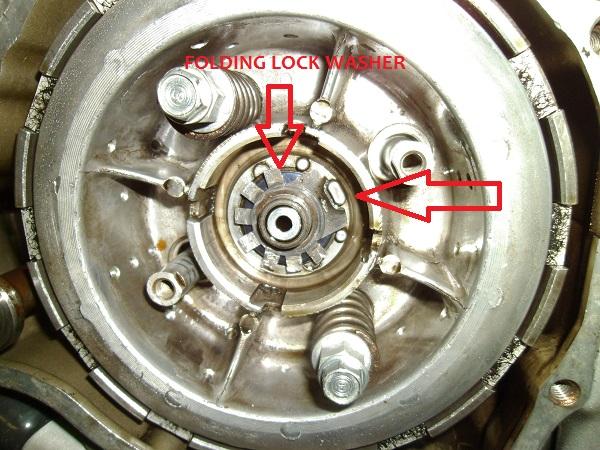
It is the correct method! But as I dont own one I use a large flat blade screwdriver and a hammer to knock mine loose. If you don't want your retaining nut to look boogered up like mine,then get the tool. There is a folding lock washer that locks the retaining nut in place.
Before you attempt to loosen the nut find which tang on the folding lock washer is engaged and pry it up out if the way.The tang that was folded over may want to snap off when you do this. Be ready to catch it with a magnet if it does. If it doesn't snap off,use a Sharpie to mark which one it is so that you don't reuse that same tang. Considered it weak and ''used'' at this point.
After you unlock the tang and remove the nut pull the folding lock washer out of the way.Then you will see the convex washer. Note which way this washer comes out. It is designed to help maintain pressure on the clutch hub in operation.
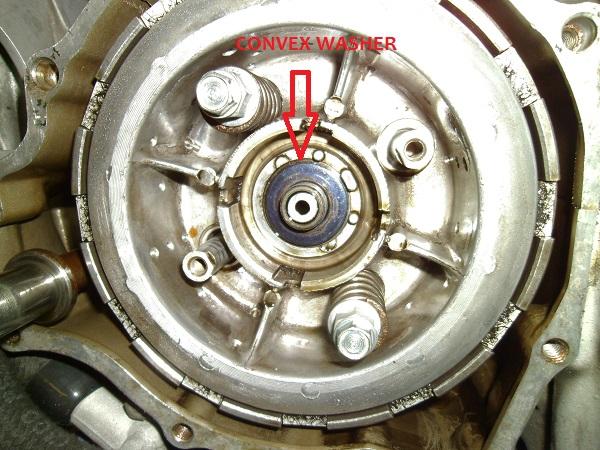
Here is how the convex washer installs.

Once you remove the convex washer the clutch assembly is ready to slide out.
But,there is a splined spacer washer behind the clutch pack.Sometime it can stick to the back of the clutch pack (because of the oil on it) when you go to pull it out.Just keep an eye out for this as you dont want it to fall down inside the engine case.Just slide the clutch pack slowly out and you'll probably see the splined washer still in it's place,but it never hurts to be careful. If it does slide out go ahead and reinstall it now. It absolutely
must be in place,so go ahead and do that now while you're thinking about.

Now you have the clutch pack out.
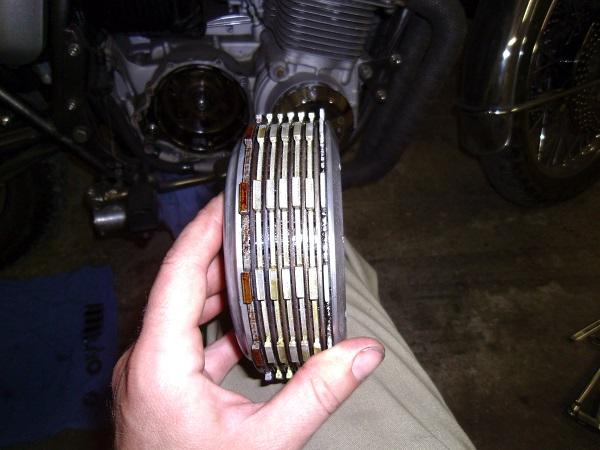
Go ahead and remove the two clutch springs that you used to hold it together and it'll all come apart for cleaning.
Now,not all CB750 clutches are identical inside. Around 1975 (This is a '76 pictured) Honda introduced some revisions to help cure the clutch rattle these bikes are known for,and also to give a smoother engaging clutch.
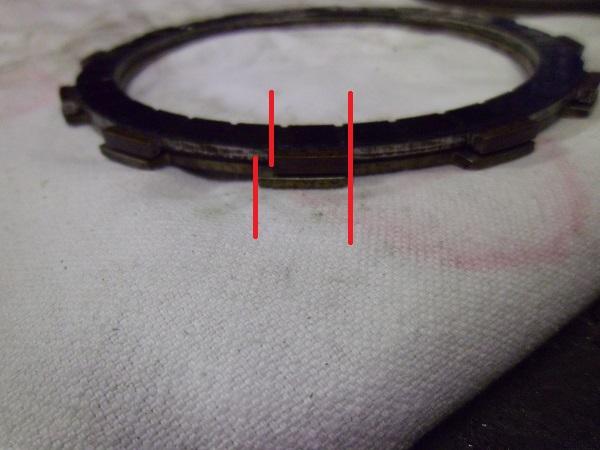
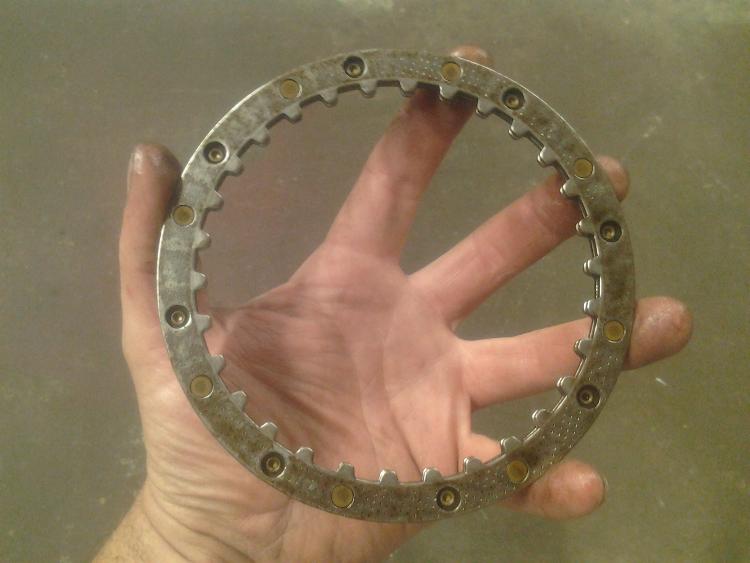
The revision for a smoother clutch was the addition of a larger outside clutch plate. The friction surface is the exact same size as a standard clutch plate,but the tangs are wider.
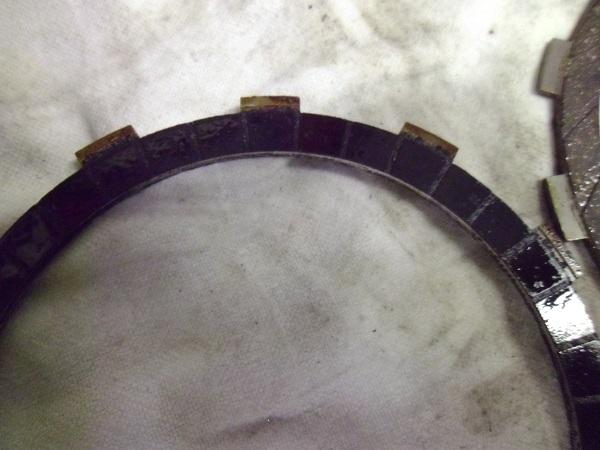
Why? To make sure the outer plate got installed in the correct location. The outer plate has a ''swirled'' design to the friction pucks vs the standard ''square'' pucks.
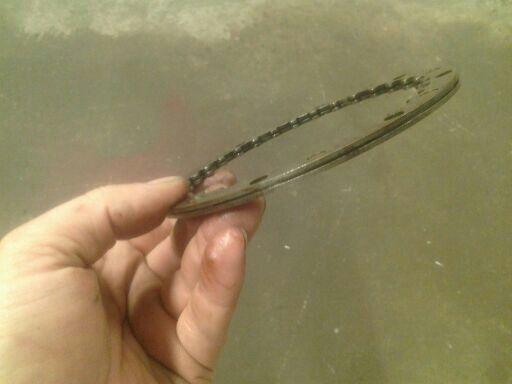
Standard square pucks
Swirled pucks
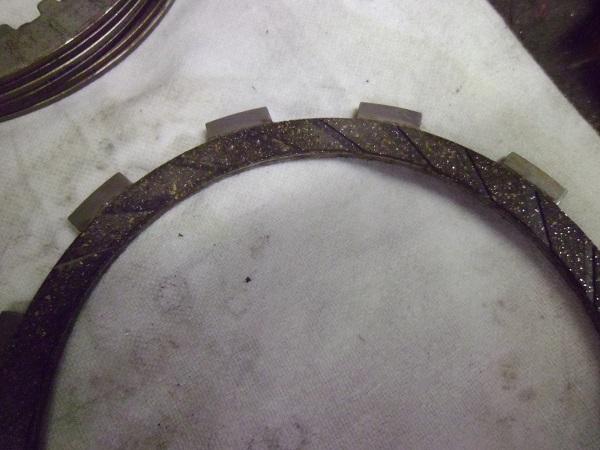
The swirled design was to used to maintain oil in the clutch longer.Due to the rotation of the engine and the swirled driection of the pucks they retain oil for a longer period of time forcing the oil to ''drain'' out of the way slower,thus a slower/smoother engaging clutch.
There are aftermarket outer plates available to replace the swirled pucks with the standard square pucks,while still having the wider tangs. They provide a much snappier feeling clutch. You can use a standard ''inside'' plate also,but the smaller tangs create a lot of slack in the basket and will make for a very noisy clutch. I swapped my outer swirled plate for an aftermarket square puck plate and it really does make a noticeable difference.
The revision for clutch chatter was a double-steel plate. The two plates are riveted together with a wafer spring between the two of them. The idea was that retaining some tension in the clutch pack would help eliminate chatter. It installed in the center of the clutch pack and took the place of one friction disc.This is why the earlier clutches have 6 friction discs and the later only run 5.You can remove this plate if you are not worried about clutch noise and install the 6th plate. Most clutch kits will come with all 6 plates anyway.I did this on mine and I can promise that it will indeed make your clutch louder. I promise.
Double steel plate.
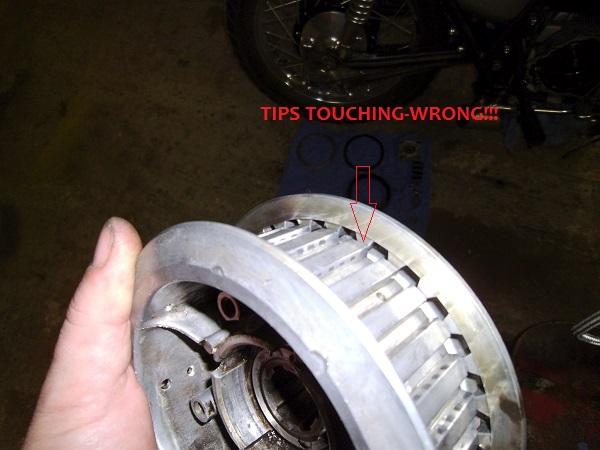
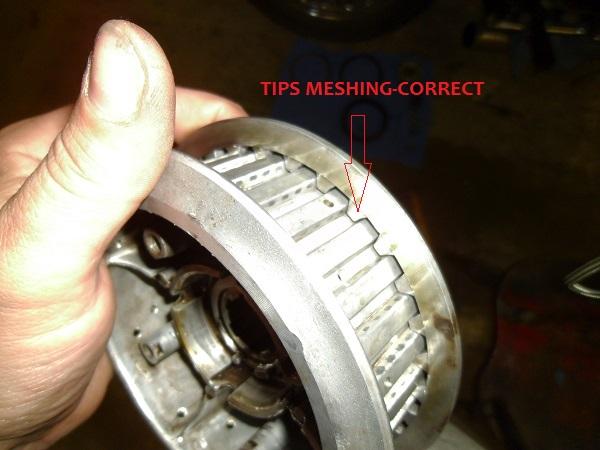
Ok,remember the cracked lifter plate horror stories? Here is how to prevent that.
What happens when a lifter plate gets cracked is the two halves of the clutch(pressure plate and hub) do not get aligned properly. It's very easy to overlook,but just as easy to get right. There are ''highs'' and ''lows'' that the friction plates and the steel plates engage into. If you do not mesh the outer clutch half to the inner clutch half then the lifter plate will bottom out on the clutch springs instead of the posts it is supposed to rest on. This is what cracks the lifter plates! Since the four lifter plate posts are evenly spaced the halves can be assembled together every 1/4 of a turn,but it will not assemble correctly in every position. Make sure the two halves are meshing and use a Sharpie to make you a set of marks.
Get them meshed properly then mark one of the posts/holes while all the plates are out since it will be impossible to see with the plates in place. This way you know you have it right when you go to reinstall the clutch.
Another thing can crack a lifter plate is if it does not rest on the posts properly. This is important to check for,but very easy to get right,so don't let it scare you. There are cutaway's on the lifter plate and the posts that you will see once you get it all apart. When you go to reinstall the clutch pack you will be able to jiggle the pack and feel these places engage as the pack will drop slightly in to position. Again,this is important,but not difficult. Just keep an eye out for this,but don't let it scare you. It's really very simple.
Now before you assemble the clutch pack it's a good idea to deglaze your steel plates. You
DO NOT want to use rough sandpaper here as it will create too much of a grabby surface and you can literally rip your new friction plates to pieces. Most people use Brillo pads,or the like,I use 600 grit sandpaper per the advice of a trustworthy source.
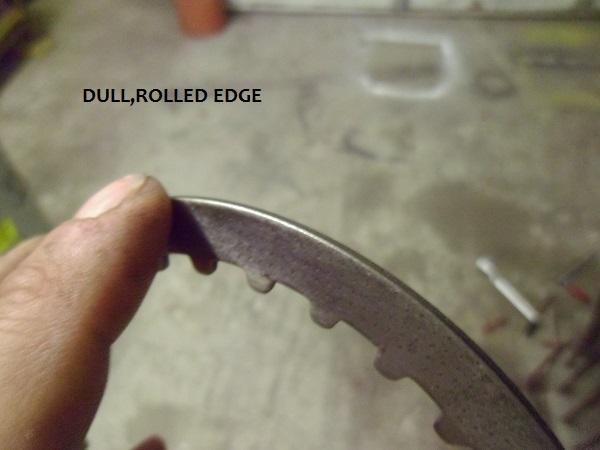
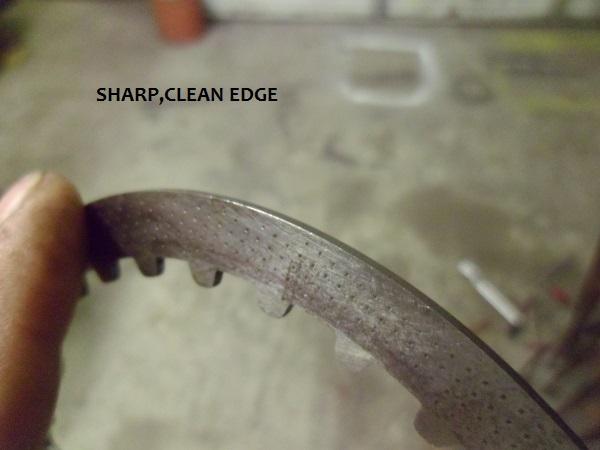
Also,your steel plates are not reversible! The plates are stamped out in manufacturing and this creates a ''roll' to them. They do not lay 100% perfectly flat. It does not matter which way your steels face,just as long as they are all facing the same way. If they are mismatched in direction, the ''roll'' of the plates can work against each other and will give you a mushy feeling clutch. But this is very easy to check for. When the plates are stamped it creates two edges. A nice,clean squared off edge and a rolled edge. It's hard to see the edge sometime but it's easy to feel with your finger. One edge will feel sharp,whereas the the rolled edge will feel dull. To help keep them all sorted out after you check the edges mark them with your Sharpie as you identify which side is which. I mark all the rolled edges with a small ''x'' and stack them up in order.
Now you're ready to assemble the clutch pack and get it back in the bike. Make sure to alternate the plates by friction-steel-friction-steel-etc, with a friction plate being the outer most plate.
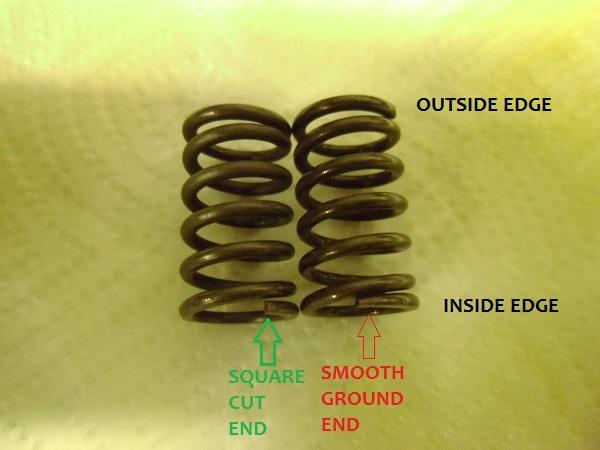
Now is a good time to get the clutch springs organized and pointing in the right direction. Some springs are directional,some are not. Some springs will have one edge that is trimmed off square and the other will be ground flat. The edge that is ground flat it the edge that will be to the inside of the motor. The ground edge will not dig into the clutch hub like the square cut edge could.
Once you get the clutch pack all together go ahead and reinstall the two temporary clutch springs.Point them the right direction now and it will make life easier later. You will have to align the outer tangs of the friction plates as you put the pack back in the bike so dont put a lot of tension on the springs. Just enough to keep the two halves together to ensure that your halves stay meshed together <- lifter plate safety!
Double check that your splined washer is in place and seated as far back as it will go.
Now the inner portion of the clutch pack will be engaging on the input shaft while your are installing the clutch pack. You have to twist the friction plate tangs in to position to fit in to the basket as you install this. This is why it's important not the have a lot of tension on the temporary clutch springs.
Once you get the clutch pack back into the bike it might not seat all the way on place. If it is not seated completely the tangs of the outer plate will either stick out or sit flush with the basket. Just keep jiggling until is falls all the way in.
Now put the convex washer in place.
Then the foldable lock washer.Make sure it sits in position correctly. There is a wide spot on the washer that sits on a wide spot on the clutch hub. You'll see it. It's easy to spot.
Now put the retaining nut back on and tighten it down. Dont try and kill it! It needs to be good and tight,but not everly tight.The foldable lock washer will make sure it doesn't come loose. If you are not using a torque wrench,it needs to be tighter than a spark plug,but not as tight as the lug nuts on your car. A good tug on a 3/8'' ratchet will do the job if you are using the proper tool. If you are using the hammer and punch/screwdriver method,run it down finger tight then knock it around until a new tab (remember,you mark the previously used tab,right?) comes in to position.
Don't forget to lock down a
NEW tab! Fold it over with a flat blade and then give it a few taps to seat it down on there good. Dont hit the flat blade so hard as to damage the tab,just get it all the way down.
Now it's time for the lifter plate.Have your clutch springs laying beside you,pointing the right direction. You'll have to remove the two bolts holding the temporary springs to do this part. So have everything you'll need ready(tools and parts) so you won't have to take your hand off the bike. When you take the bolts out keep one hand on a lifter plate resting post and keep it pulled up against the rest of the clutch pack. This will ensure everything stays meshed in place. Slide on the other two springs and then the lifter plate. Once you get one bolt through the lifter plate you will be able to use that as a handle to keep everything pulled up tight and in mesh. Go ahead and install all four lifter plate bolts-
BUT ONLY FINGER TIGHT!!!!This where aligning the cutaway's on the lifter plate and the post's it rest on comes in to play. If the plate gets cocked it will not want to slide on the posts correctly. So make sure your plate is going on straight
AFTER you get all four bolts finger tight.
Compare the outer edges of the lifter plate to the outer edges of the clutch pack to get it going on straight.
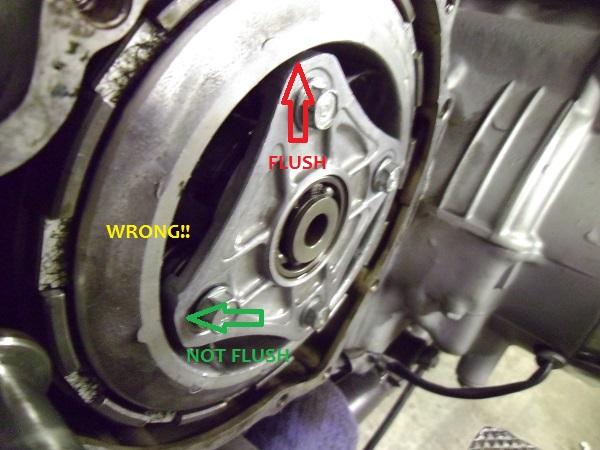

Now that you have the outer edges flush start tightening the lifter plate,compressing the clutch springs.
FROM THIS POINT ON,ONLY TURN THE BOLTS 1/2 TURN AT A TIME IN A CRISS CROSS PATTERN!!! THIS IS THE LIFE OF YOUR LIFTER PLATE!!!(Criss cross pattern,not circular. Think: left-right-top-bottom...left-right-top-bottom...)
Now is when you will be feeling for the lifter plate to sit down on the cutaway's. I do not use a ratchet handle for this part. Just a socket wrapped in electrical tape for added grip. As you tighten the bolts keep jiggling the lifter plate in a circular,twisting motion. You will feel it when it starts in to the cutaways at this point. Once you get to a certain point you will have to start using a ratchet handle,but it is important not to use a lot of pressure here. Just enough to compress the springs ( 1/2 turn at a time! ) until the lifter plate seat all the way down.
I hold my fingers all the way up next to the head of my ratchet to keep me from using too much pressure.
If it feels that you need more pressure than this hold will allow-
STOP-because the lifter plate must not be engaging on the cutaway's properly. Back up and restart the lifter plate assembly. Remember,if you do have to back up and restart,still only turn the bolts 1/2 turn at a time. Even for backing off.
Once the lifter plates seats fully (you'll feel it) tighten the bolts and you're done!
Hope this helps. I'll post up about adjusting the clutch later.


 Looks like I am going to have to get on you again about using the right tool for the job.
 A hammer, and a screw drive are not designed for removing retaining nuts!!!