New member from the STL. 1981 CB750C

classic Classic list List threaded Threaded
43 messages Options
123
Reply | Threaded
Open this post in threaded view
|

Re: New member from the STL. 1981 CB750C

djpj
Update:

Master cylinder clean and flushed with new fluid. I'm having a local shop build some new brake lines for me.

Replaced the faulty float valve and all the gaskets and the carburetors don't leak any more. But now I think I have a dead cylinder number 2. I felt the exhaust and they were all super hot except number 2. It was slightly warm but I think that was just from the radiant heat of the other exhaust pipes.

I checked the drain on the float bowl and there's fuel in the bowl. I checked the spark with an inline spark tester and it flashed thoroughly. So I took some extra gas in a pipette and squirted it into the number 2 carb with the airbox removed and the engine smoothed out and the exhaust pipe got hotter. So maybe somehow the fuel isn't getting from the float bowl to the cylinder.

I know the jets are clear and the needle slides easily. The only thing I really changed on the that carburetor was it was missing the accel pump gasket and I replaced the float bowl gasket. Last time I had the carbs together the float needle in the number one carb wasn't letting in any fuel but the number two carb was working fine. Now the number one is working fine and the number two isn't.

Would anything with the accel pump (diaphram, gasket, etc) keep the fuel from flowing out of the float bowl? I don't think I did anything else to that carb from last time. This is frustrating.


PJ
1981 Honda CB750C - First classic bike
STL
Reply | Threaded
Open this post in threaded view
|

Re: New member from the STL. 1981 CB750C

djpj
I also replaced the passage plugs too because they were all old and hard. I wonder if I need to blow out the passage under the plug with some compressed air.

I don't think it's the float or needle valve because after I found the number two not working I swapped the float and needle valve with number one and I had the same problem.

PJ
1981 Honda CB750C - First classic bike
STL
Reply | Threaded
Open this post in threaded view
|

Re: New member from the STL. 1981 CB750C

TOOLS1
Administrator
The accelerator pump only squirts a little fuel into the engine as the throttle is turned from closed to around 1/4 open to richen up the charge while accelerating. On the carb leaking gas, try cleaning the needle seat with a Q-tip and metal polish. I use Turtle Wax Chrome Polish. On the cylinder not running, did you remove the pilot jet and run a wire through it to clean it? If not it is probably plugged.
TOOLS
Life is not about the number of breaths, you take, but the moments that take your breath away.
I don't have an anger problem. I have an idiot problem. Hank Hill
Never confuse education for intelligence.
Happiness is a belt fed weapon.
I just can't imagine what could go wrong.
No fire? No explosions? So whats the point of your story?
Those who are too smart to engage in politics are punished by being governed by those who are dumber. ~Plato
It couldn't be done, but the darn fool didn't know it, and did it anyway.
We all got problems. Ksharp
I like vintage bikes because they take me away from the clutter of technology that I work with everyday and back to a simpler time of mechanical elegance and simplicity.. "ninadm"
Darkwing Duck: The worst part of public transportation is the Public.
"That is awesome shit there" Re-Run
"Fear nothing, attack everything" Eric Berry
" Oh, you read that on the internet? Clearly it IS a massive problem. Of course it CAN’t be normal operation."

1976 CB 750-A X 2
1977 CB 750-A X 4
1977 CB 750-K
1976 CB 750 F
1981 CB 750
1966 Kawasaki SG 250
1981 KZ 750 LTD
1973 CB 350
1979 CM 185 Twinstar
1982 Honda XL 80
South of Eden (Kansas City MO)
Reply | Threaded
Open this post in threaded view
|

Re: New member from the STL. 1981 CB750C

djpj
Tools,
I didn't know if the accel pump could leak air into the carb and reduce the ability to suck up fuel.

I did polish the needle seats and now they are leak free. I used a q-tip in a small drill and polished them to a mirror shine.

I did remove the pilot jet and ran a wire through it but I could check again when I look at the slow speed passage under the plug.

PJ
1981 Honda CB750C - First classic bike
STL
Reply | Threaded
Open this post in threaded view
|

Re: New member from the STL. 1981 CB750C

TOOLS1
Administrator
No the accelerator pump would have nothing to do with the carb sucking fuel into the jets. The only other thing then a plugged jet/passage would be if the float level was way off not letting the fuel go high enough the cover the jet.
TOOLS
Life is not about the number of breaths, you take, but the moments that take your breath away.
I don't have an anger problem. I have an idiot problem. Hank Hill
Never confuse education for intelligence.
Happiness is a belt fed weapon.
I just can't imagine what could go wrong.
No fire? No explosions? So whats the point of your story?
Those who are too smart to engage in politics are punished by being governed by those who are dumber. ~Plato
It couldn't be done, but the darn fool didn't know it, and did it anyway.
We all got problems. Ksharp
I like vintage bikes because they take me away from the clutter of technology that I work with everyday and back to a simpler time of mechanical elegance and simplicity.. "ninadm"
Darkwing Duck: The worst part of public transportation is the Public.
"That is awesome shit there" Re-Run
"Fear nothing, attack everything" Eric Berry
" Oh, you read that on the internet? Clearly it IS a massive problem. Of course it CAN’t be normal operation."

1976 CB 750-A X 2
1977 CB 750-A X 4
1977 CB 750-K
1976 CB 750 F
1981 CB 750
1966 Kawasaki SG 250
1981 KZ 750 LTD
1973 CB 350
1979 CM 185 Twinstar
1982 Honda XL 80
South of Eden (Kansas City MO)
Reply | Threaded
Open this post in threaded view
|

Re: New member from the STL. 1981 CB750C

djpj
Gotcha.

I swapped out the float and needle valve with a carb that was running perfect and it still didn't work so I don't think the level is off.

I'll just double check the jets and passages again.

PJ
1981 Honda CB750C - First classic bike
STL
Reply | Threaded
Open this post in threaded view
|

Re: New member from the STL. 1981 CB750C

Re-run
Administrator
Hook a piece of clear fuel tube to the drain nipples and turn the drain screw open. make sure to angle the tube up first! The levels in all 4 should be about the same. This would rule out the floats and floats needles.
The ride IS the adventure. The destination is just to get gas!
Reply | Threaded
Open this post in threaded view
|

Re: New member from the STL. 1981 CB750C

djpj
Re-run,
I'll do that before I take them off again. Thanks.

PJ
1981 Honda CB750C - First classic bike
STL
Reply | Threaded
Open this post in threaded view
|

Re: New member from the STL. 1981 CB750C

djpj
Update:

Front brake lines are all put together and new fluid in them. Makes a big difference.

Checked the fuel level in the bowls and it's all good
http://imgur.com/3IcOkia

Then I sync'd them with a home made manometer. Took some brass and put some threads them to mount them to the engine.
http://imgur.com/oHRhSuJ
http://imgur.com/rD1FKk2
http://imgur.com/6d8g2fs

I didn't have the idle set right and it just sucked up the oil at first but once I got it set to about 1200-1300 the vacuum evened out and made things a lot easier. A little hookie but it works.

Carbs are running good but I think the idle mixture is too lean. It will stay idling higher for a few seconds and then come down, it has a short hiccup for a tenth of a second when applying throttle, the idle speed has to be adjusted once the engine is up to speed. So that'll be fixed next. I originally set the mixture screws to 3 turns out. It feels pretty close to what it needs.

http://imgur.com/teCwOwJ

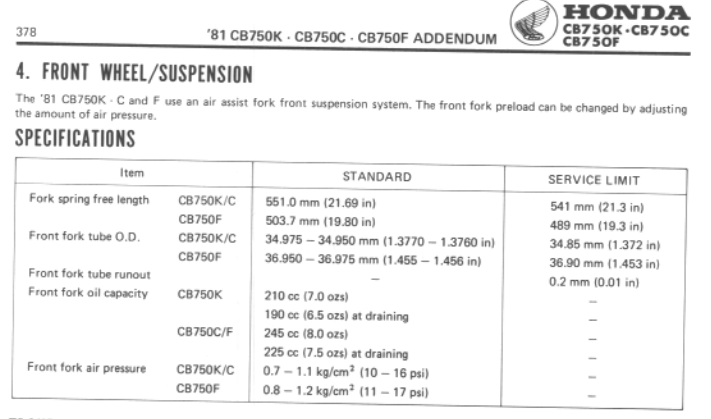
Got the bike inspected and it passed somehow. I blew out a fork seal on the way to the inspection station. I think what happened was the forks didn't have air in them when I got it and so I added about 12 psi to it. When I started driving it the added preload must have just been too much and forced some fluid past the seal.
http://imgur.com/ZQVzkAn

So I get to change the fork seals and I might as well add some progressive springs while I'm at it. I've never done either but I have found some good step-by-step instructions for it. And if I'm doing the front I'll have to find time/money for the rear also.

New to do list:
Adjust idle mixture
Adjust throttle cable
Find a shifter rubber cover
Replace fork seals and springs
Get plates on it.

PJ
1981 Honda CB750C - First classic bike
STL
Reply | Threaded
Open this post in threaded view
|

Re: New member from the STL. 1981 CB750C

Re-run
Administrator
Well, idle should be around 1000 or so. So that is ok. You set vacuum at that speed and just blip the throttle every so often, just a bit to see how things settle out. The gauges dont have to be perfect, that is virtually impossible. Just within a certain range of each other. I shoot for about half an inch, or about 12mm if you are one of those!

Check your plugs, if they were decent plugs, they should show if your mix is lean or rich. OR you can hook up a tach, not the bike tach as those are too inaccurate. And adjust your mix after the carbs are synced.

The air forks do not take much air, about 7 psi should do it. Use a hand pump, too. I have heard of people blowing their seals using an air compressor. Many people with air forks also ditch using air if they use progressive springs.
The ride IS the adventure. The destination is just to get gas!
Reply | Threaded
Open this post in threaded view
|

Re: New member from the STL. 1981 CB750C

djpj
Ya I got the sync pretty damn close to each other and the bike definitely runs smoother. I'll check the plugs next and see how dark or light they are.

I read the range for the forks is 10-16 psi and there wasn't any in it. So I connected the bike pump and gave it two pumps. I guess that was just too much for those old seals. I think i'll go with progressive springs in the front and run no air. Then get some replacements for the rear shocks and springs.

PJ
1981 Honda CB750C - First classic bike
STL
Reply | Threaded
Open this post in threaded view
|

Re: New member from the STL. 1981 CB750C

Re-run
Administrator
Progressive and Hagon make good shocks for these bikes, that DON'T totally break the bank. Couple hundred clams, and they even build them to your riding style, at least to an extent.
The ride IS the adventure. The destination is just to get gas!
Reply | Threaded
Open this post in threaded view
|

Re: New member from the STL. 1981 CB750C

djpj
Update:

Ordered some Progressive springs and some All Balls fork seals and dust seals. Should be here soon, I ordered them from Amazon.

Couple questions:
1. Does the spacer come with these springs.
2. If not, what size length and diameter will I need?
3. If so, does it need to be cut down?

I plan on putting the springs in with the tighter coils up top and I won't have to adjust the fork oil to compensate.

4. Just regular ATF - Dexron style?
5. What can I replace the air-assisted fork caps with that would allow me to remove the air hose? Any caps that will swap?
6. Am I missing/forgetting anything?

Thanks.

PJ
1981 Honda CB750C - First classic bike
STL
Reply | Threaded
Open this post in threaded view
|

Re: New member from the STL. 1981 CB750C

heath1066
I used Black Iron Pipe Nipples for my spacers, just put in some washers to take the springs and on top to protect the aluminum of the fork caps.  Think I used 3" nipples.

I replaced my air nipples with these:
http://www.dimecitycycles.com/cb750k-cb750f-79-82-billet-top-fork-nut.html

Kinda pricey, but fit perfectly.

Heath
Chicago, the greatest city in these United States
1982 CB750C in progress...
Reply | Threaded
Open this post in threaded view
|

Re: New member from the STL. 1981 CB750C

djpj
Heath: Those caps look awesome. The page states that the caps are for a K or F, do they work on the C also?

The manual says 8.0 ounces of fork oil. Is this the correct amount when using progressive springs?

I took the forks apart and it was just sludge so I'm beyond due apparently.

Waiting on the springs to come in the mail next.

PJ
1981 Honda CB750C - First classic bike
STL
Reply | Threaded
Open this post in threaded view
|

Re: New member from the STL. 1981 CB750C

heath1066
Yup, they are currently on my bike.  Work like a charm.  I think I used six ozs of fluid?  Yes, 1981-82 CB750C addendum says 172.5-177.5 cc (5.8-6.0 ozs)
Heath
Chicago, the greatest city in these United States
1982 CB750C in progress...
Reply | Threaded
Open this post in threaded view
|

Re: New member from the STL. 1981 CB750C

djpj
Heath,

My manual with addendum says 8.0 ounces when completely empty.


It seems like a good amount for now. Test ride will ensue after the tropical storm we seem to be having the in midewest.
1981 Honda CB750C - First classic bike
STL
Reply | Threaded
Open this post in threaded view
|

Re: New member from the STL. 1981 CB750C

djpj
Update:

Forks are done!

I purchased from Amazon
All Balls dust cap + fork seal kit. Part number: 56-115
Progressive Springs. Part number: 11-1106

I followed the directions posted:
http://www.cb750c.com/modules.php?name=Forums&file=viewtopic&t=244 
http://www.cb750c.com/modules.php?name=Forums&file=viewtopic&t=23136
http://www.cb750c.com/modules.php?name=Forums&file=viewtopic&t=12937
as well as a youtube video:
https://www.youtube.com/watch?v=reQ6qLQgvx0
I didn't follow the video on a few parts. Namely the use of motor oil in the forks and I believe they cut off the old fork seal while it was still on the upper fork (horrible idea).

I basically kept the upper fork in the mount until the fork was in two pieces then took it all out of the triple trees. I also ran some metal polish on the fork upper where the fork seal would glide then cleaned off the polish with some alcohol.
http://imgur.com/tRkFRwf
http://imgur.com/T8aVGEW
http://imgur.com/2FG4wIb

Then I cleaned all the parts inside and out. I used a little brake cleaner and high pressure washer. That got all the sludge out of the little spots.
http://imgur.com/ImwBfns

After I got the parts clean, I put the two halves back together as per the directions. I used the old fork seal to help drive in the new one. Then I put them back into the triple. Easy if you put them back together in the right order and remember to put the drain plug in (lost a cup of oil in that mistake).

Time to compare the new vs old springs.
New on top and old on bottom.
http://imgur.com/lX4dOte

For a spacer I used 1/2" pvc. I bought the 3/4" as the springs are 1" but I guess pvc is measured ID and I measured the springs OD. The 1/2" pvc worked well.
http://imgur.com/v0netrU

Measuring time!
Old springs - 22.75"
New springs - 19"
So spacers were cut to 3.75" and sanded the edges and cleaned them of any loose debris.
http://imgur.com/d5tsl0F

I put in fresh 8 oz of fork oil, then placed in the progressive springs with the tighter coils up top near the cap.
Tip for putting on the fork cap. Try screwing them on without the spacer in to determine where the threads lock in, remember this position. Next remove the cap and put the spacer back in. Now push the cap back on with the handle of a hammer, smallest one you got. You should now have enough room to put the 17mm wrench on the fork cap and twist that sucker until the threads are fully seated. Now you can take off that hammer and twist the cap fully on.

Reassemble and it is done.
http://imgur.com/iz9HKf4

Thanks for everyones help with this. It was way easier than I anticipated.

PJ
1981 Honda CB750C - First classic bike
STL
Reply | Threaded
Open this post in threaded view
|

Re: New member from the STL. 1981 CB750C

djpj
This post was updated on .
So I'M BACK. I've been gone for military duty and busy at work but I did get some stuff done.

I attended my first Vintage Bike Night at Schlafly Bottleworks. Some people really loved that front fairing.
http://imgur.com/yqc9q4y

On the trip home I noticed two things:
1. Part of the front fairing flew off on the highway and landed in the bushes. So that thing's got to go.
2. A creep to a high idle when it's really hot. Went home and tested for a vacuum leak to discover carb insulators 2&3 were cracked but didn't show until it was really hot. So I ordered new aftermarket ones.

The front fairing pretty much fell apart as I took screws out.
http://imgur.com/JwRNXex

I then replaced the insulators on the carbs and no more leak. While the carbs were off the bike I discovered an issue with the accel pump circuit. The fuel would drip out of the accel injectors and not spray, and carb 4 wasn't getting any at all. So I replaced the diaphragm, spring, boot and all. Then I stuck a needle in the accel injector of carb 4 and got some air flowing through it. All good now.

Someone on another forum convinced me I was being lazy with the carb sync so I bought some real gauges. I connected all four gauges together and then connected that to cylinder 2 to adjust them to be equal. Then I connected them to the individual cylinders and set my idle at 1000 and sync'd them. The idle could still probably come up a hair. The idle also still has a slight rumble to it but it's more smooth and accelerates quick and smooth now. The accel pump really made a difference.
http://imgur.com/MPOJDAp

While I was there I replaced my old horn for a new Wolo type. I'm considering running a dual (hi/lo) setup in the future.
http://imgur.com/VqRTfLo

Next, it's onto the front lights.
1981 Honda CB750C - First classic bike
STL
Reply | Threaded
Open this post in threaded view
|

Re: New member from the STL. 1981 CB750C

djpj
I had to completely disconnect the front wiring to get the fairing off.
http://imgur.com/a/bRVRx

The original harness was all chewed up with splicing tools. Worthless crap destroys the old wiring so I had to replace portions of the wiring.
http://imgur.com/BNQfMvG

Pulled the wiring up an through the brake bracket and labeled all the wires.
http://imgur.com/UGx2ivj
http://imgur.com/iNQ5Sz9

Removed unused wires and cleaned up the area making sure not to leave any exposed wires or un-soldered joints. I also added a new headlight plug and extended the headlight wire to make it easier to stuff into the bucket.
http://imgur.com/f14kKXR
http://imgur.com/4ZLvUwH

Now it is time for the aftermarket fork mounts and turn signals. I thoroughly sealed the turn signals with some silicone. Slight overkill.
http://imgur.com/M9JFXzp

Then I mounted the turn signals to the headlight mount and clamped them to the forks.
http://imgur.com/hdlY73u
http://imgur.com/PMa4VPX
http://imgur.com/rxwbhJr

I used part of an old military rubber boot for a washer between the headlight and the mount. This should keep it from wiggling and won't be too unisightly.
http://imgur.com/tDdSB4K

All ready to go (or so I thought).
http://imgur.com/JtiHaO3

New headlight from Amazon. Looks great.
http://imgur.com/KxPEwsZ

Connected and tested.
http://imgur.com/yP2GRyI

Then I went to mount the headlight and found the mounts were too far apart. So I flipped the mount and got them closer together. Crisis averted. I'm going to buy some acorn nuts later to cover the threads of the bolts. I then opened up the headlight bucket, wound the wires in, and put it all back together. Beautiful.
http://imgur.com/KDFplnK
http://imgur.com/c0L76fV (Here you can see the mounts flipped and threads sticking out. I also did get more of the wiring hidden in the bucket after this photo)
1981 Honda CB750C - First classic bike
STL
123