I spent quite a bit of time typing this in another thread and thought I'd post it here to hopefully help others in the future.
Note: The only way I got half ways decent at broken bolt removal is by breaking WAY too many bolts in my days.

I would never jump right to a classic "easy-out".

They are extremely hard therefore brittle... very easy to snap off. Then a broken easy-out is next to impossible to remove without help from a machine shop. Also an easy-out's tapered shape expands the bolt and can wedge it even tighter.
Do not use WD-40, it is not a penetrant, it's a silicone preservative / water dispersant (WD).
Get yourself a good penetrating oil. PB Blaster, Kroil, or believe it or not, a homebrew 50/50 mix of acetone and transmission fluid (ATF) is best. Spray it down repeatedly.
Then a center punch right smack dead center on the broken bolt. You can start light taps to verify your in the center but you want to finally give it a good stout "whack". This does two things...
1. It gives you a center point to keep the drill bit from walking
2. Shocks the threads and breaks the corrosion and gives the penetrant micro passages to soak into.
If there is a peak in the break at the center, your drill will walk to the edge and you'll damage the threads.
If you have a Dremel you can use the smallest round headed burr to grind a starting point in the center. But you still want to center punch it to help break loose the corrosion on the threads
Spray it down again and let it soak it a MINIMUM of over night. Pateince is a key factor in all this.
Pick up a set of "Left hand" drill bits. To use these you need a reversable drill.
Start with the smallest bit and with your drill in reverse, carefully drill a pilot hole exactly centered and straight into the bolt. With any luck it will back out with this first drilling. If not, jump up a couple sizes and this time go slowly. The larger bit will want to follow your first pilot hole but you still need to be careful to stay centered and straight.
The sharp edge of the bit will bite into the bolt and usually back it right out.
You can use a propane torch and gently heat the surrounding aluminum but be careful and quick. The aluminum will expand faster than the steel bolt at first and thats you window to work in... but once the heat transfers to the steel it expands as well. So you'll need to let it cool and try again. Several small heat and cool cycles will also let more penetrating oil soak in, so spray it after each heating. Then try drilling again.
IF this all does not work, then you can try a screw extractor (easy-out). BUT they are not all alike.
Ridgid makes a good set and Snap-on / Mac tools (read expensive) has a similar version... but the original from Ridgid are THE BEST!
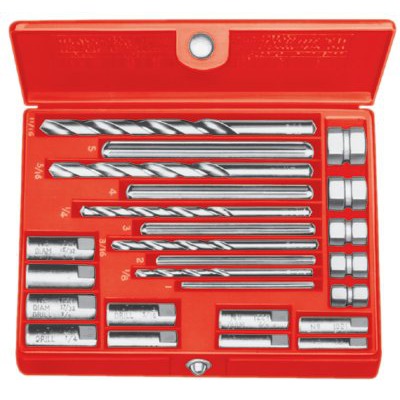
Notice a couple things in this set? The extractors are straight, not tapered. They are actually a star shaped rod with sharp points to grab and you tap them into the hole with a hammer. Each extractor has the properly sized drill bit. Each size also has a centering guide (along the bottom) to help you drill the hole straight. Finally, along the right side, is the adapters that fit the star shaped extractor and you can use a 6 or 12 point wrench or socket on instead of the four flats on a regular "easy-out".
If you choose to use a regular old fashioned "easy-out", use a Tap handle on it.
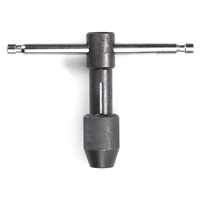
That will fit the four sided head better than a open end or Cresent wrench and make it much easier to control.
DO NOT HEAT IT. That seems to make them even
more brittle and easier to break. Carefully and slowly try but go straight into the drilled hole and
feel if it is working. Remember the taper? Watch for expansion of your broken bolt and if the easy-out starts to twist at the top but not at bottom STOP.
Soak it with more pentrant and leave it over night, then try again the next day. If you feel more heat is needed remove the easy-out from the hole first and let it cool before trying again.
That's as much of my experiance I can think to pass on. Good luck to you!
81 Honda CB750C - Current Project
67 BSA Spitfire MkIII - Next Up (Full Resto)
81 Honda GL1100 - Bob / Cafe´
80 Suzuki GS750L - Bratstyle
72 Honda CB450K5 - Basket Case
73 Honda CB350F Cafe' (Gone but not forgotten)
Don't wait for opportunity to knock... kick the door down and drag the old harlot in!


 The only place I have got this from is msc or producton tool supply on line.
