DOHC carb cleaning procedure

classic Classic list List threaded Threaded
30 messages Options
12
Reply | Threaded
Open this post in threaded view
|

DOHC carb cleaning procedure

Re-run
Administrator
I gleaned this from another site.  Credit goes to PD750 and mstspot.

CLEANING DOHC CV CARBURETORS


Notes:

* Right and left are always as sitting on the bike.

I use an old card table with a clean sheet of cardboard on it. That gives plenty of room for parts layout and a clean work surface. I use the clear plastic Gladware containers with lids to keep each carbs small parts in and from getting lost. Label each container with the respective carb #. Carb #1 is the farthest left.

** Sometimes the bowl and cap screws don’t come out easily. Try this: Start by applying penetrating oil to each of the screws. Insert the correct screwdriver into the screw head and hammer the screwdriver handle straight on with a fair amount of force once or twice. Many times this will be enough to break the bond between the screw and the carb.

If that doesn’t loosen the screws, you can use a hand held impact driver. A friend would be able to hold the bank steady.

*** Rubber diaphragms can be checked for otherwise undetectable holes by shining a bright light thorugh them.

**** Pay close attention to how everything comes apart and where everything goes. Take pics and or make notes along the way.

***** Be meticulous. Take your time and do it right, the first time.


SAFETY FIRST. Protect your eyes.


1. Remove and safeguard the side covers.
2. Disconnect the battery.
3. Turn off the fuel.
4. Remove seat.
5. Disconnect the fuel hose and remove tank.
6. Pull the carb bowl overflow tubes up so they are free.
7. Loosen the drain screw and drain each carb bowl.
8. Loosen the air box to carb boot clamps and loosen the boots from the carbs, just so they aren’t sticking.
9. Unclip and remove the two (2) engine vent hoses at the top of the air box.
10. Loosen the air box mounting bolt (on top). Move the air box toward the rear of the bike and retighten the bolt.
11. Remove the air box to carb boots.
12. Loosen the insulator (carb to head boots) carb clamps and move them forward.
13. Loosen the choke cable mounting screw from the left side.
14. Loosen the 10mm throttle cable mounting/adjusting nuts and slip the cables out of their mounts, paying attention to which cable goes where. You might tape and mark them for insurance.
15. Straddle the bike, grasp the carb bank at each end and work them up & down while pulling them backwards. A little WD40 where the carbs go into the boots might help the bank slip out easier.
16. After the bank is free from the insulators remove the cables. Note how the cable barrel ends come out of their holders on the carbs.
17. Place the bank on the worktop and remove the over flow tubes.
18. Remove each bowl and place it where it’s respective carb parts will temporarily reside. Note that #2 bowl houses the accelerator pump. Disassemble and insure the diaphragm is serviceable. Place the parts in the #2 container. Do not lose the small accelerator pump oring next to the bowl gasket on #2.
19. Remove each float pin, float and needle. Place these in their respective containers.
20. Remove each pilot screw; it’s spring, washer and oring (Insure that the orings are not flat or cracked as either can result in a bad seal and a lean condition. They must fit snug on the needles.), secondary main jet and needle jet holder, primary main jet (pay attention to which jet goes where – each jet is size stamped) and nozzle and the slow jet rubber plug. Place each item in the respective container.
21. Remove each vacuum chamber (carb cap), spring, seal ring, vacuum cylinder (slide assembly) and the black plastic air jet cover. Place all parts respectively.
22. Remove the #1 carb air cut valve cover slowly with pressure applied (make sure not to lose the small oring that lives along side the diaphragm) and insure that the diaphragm is in serviceable condition, then reinstall. If it is good, then chances are that the other 3 will also be good and the bank will not have to be separated, unless any of the cross over tube orings or any of the other linkages require attention.


If a complete carb bank breakdown is in order, please refer to the appropriate Factory Service Manual.


Time to start cleaning. Here’s one method.


23. You’ll need a disposable aluminum pan big enough to hold the carb bank and deep enough to cover the bank with solution and at least three (3) big bottles of PINESOL. NOT pine cleaner.
24. Place the bank in the pan and cover with PINESOL. This soaking may take 2-3 days. You can take them out and wash them off with water to check the progress, and then put them back in the Pinesol, if needed.
25. Carb caps and bowls can be cleaned in the same solution.
26. Test each bowls brass over flow tube to insure proper function. Look very closely (magnifying glass) for cracks along the length of the tube. Repairs can be done with solder on the brass (it will not stick to the cast of the bowl) or J-B Weld, which will stick to the cast.
27. Remove and clean the bowl drain screws. Replace the oring if needed.
28. All rubber parts, including the float needles can be soaked in glycerin (available at most drug stores) to help revitalize them.
29. Float needle tips have to be supple and smooth with no indents or scratches. Be meticulous.
30. Wipe down and closely inspect the floats and slides.
31. The jets, needle holder and pilot screw can be cleaned with carb cleaner. EVERY HOLE HAS TO BE CLEAN AND CLEAR. A brass detail brush can be handy.
32. Remove the restriction tang on the pilot screw head or part of the stop tang on each bowl. This allows for full pilot screw adjustment. Be careful not to bend the screw tip. Insure that the screw tip is clean.
33. Thoroughly rinse the now spotless carb bank with water, making sure all the solution is out of each carb. Thoroughly dry the bank. EVERY PASSAGE and HOLE HAS TO BE CLEAN AND CLEAR. Compressed air does a quick job of that. Protect your eyes.
34. Open the main butterflies (not the choke butterflies). Insure that the very small holes in the bottoms of the carb throats, where the butterflies rest, are clear. If clogged, try running a small wire through them and chasing that with a blast of carb cleaner and then compressed air. Note: the CB750 VB42 carb has three (3) such holes including the pilot hole about ½” closer to the front or head side of the carb. The CB900 VB43 carb has five (5) holes including the pilot hole.
35. Insure that the accelerator pump circuit is clear and the nozzles produce good spray.
36. Using Q-tips and Brasso or toothpaste polish the needle seats.
37. Use compressed air to insure all passages are clear, including the air jets in the vacuum (slide) chamber.


Reassembly.


38. Install the primary main jet, the secondary main jet needle holder, and then the secondary main jet.
39. Install the rubber slow jet blanking plug. It has to fit snug.
40. Place the float needles in the float needle arms. The needles should move freely on the float needle arms. Place the floats and needles into proper position in the carb bodies and insert the float pivot pins. Insure free up/down movement.
41. Install the accelerator pump oring on bowl #2. Apply a very thin coat of Threebond 1521 or a like product to the bowl gaskets and install the bowls.
42. Install the pilot screw springs, washers and orings (in that order) on each pilot screw. Turn each pilot screw in until it lightly seats (CAUTION: be very light handed as the screw tips can wedge and break off in the very small throat holes, rendering the carb useless.). Then turn each out 2 ½ - 3 ½ turns. Jets other than OEM stock will require different settings.
43. Install the black plastic air jet covers in the vacuum (slide) chambers.
44. Install the seal rings with the shoulder up.
45. Install the vacuum cylinders (slides). Note that the main jet needles should have some side play.
46. Inspect and compare all four (4) slide springs. They should be the same in wire size and loose length. Install the springs and vacuum chambers (carb caps).


Bench synchronize the carb bank.


47. Number 2 carb is nonadjustable. All others are set to match.
48. You’ll need two (2) three (3) inch pieces of small smooth same gauge wire. Straightened paper clips work great. These will act as feeler gauges.
49. Loosen the three (3) lock nuts on the main butterfly adjusting screws.
50. Open the main butterflies and gently close them on one of the wires you just laid flat in the bottom of the #2 carb throat where that butterfly contacts the throat.
51. Check the butterfly clearance on the #1 carb. Adjust it to match #2. The wire should just start to drag. Once there, tighten the lock nut for that butterfly while insuring the clearance doesn’t change by holding the adjusting screw in position.
52. Repeat step #47 on carbs #3 and #4.
53. Recheck all clearances. All four (4) should be as close as possible to the same.


Installing the carb bank.


54. Fill all the carb bowls with fuel to insure that none leak around the gasket or over flow tube and that the needles are seating. Work the accelerator pump and insure good spray from the nozzles. If you suspect that a needle isn’t seating try tapping that bowl with the handle of a screwdriver with a bit of vigor. It’s much easier to make it right now than after the bank is installed and has to be removed again.
55. Apply a SMALL amount of oil to all moving parts and springs. More is not better.
56. Soak the carb to air box boots in hot very dish soapy water about ½ hour before installation and leave them wet while installing. The soap acts as a lube to help them slide back into position and hurts nothing.
57. Just before installing the bank, apply some liquid dish soap to the inside receiving surfaces of the rubber insulators on the motor and the outside surfaces of the carb 'necks' to be inserted into the insulators.
58. Set the bank in the bike and reattach the three (3) cables.
59. Line the carb necks up with their respective insulators, insert them and work them forward until the bank is fully into the insulators. At that point the back lip of the insulators will be touching the front carb bank rail that holds the carbs together. You might even feel them snap into place.
60. Place and tighten the insulator carb clamps.
61. Loosen the air box mounting bolt and install the carb to air box boots. Remember to leave them soapy wet. Start with the two (2) inside straight boots. Slip them into place, first in the air box then onto the carbs. Tighten the clamps when the boots are fully on the carbs. Now install the outer two (2) boots the same way.
62. Push the air box forward slightly and tighten the mounting bolt.
63. Reattach the two (2) engine vent hoses to the top of the air box and reattach the bowl over flow tubes and route them.
64. Make the final adjustments on all the cables.
65. Install a paper in line fuel filter, good to at least 60 microns. Cheap insurance.
66. Reinstall the fuel tank and attach the fuel line. Turn the petcock to the ON position and inspect everything for leaks, again.
67. Reconnect the battery.
68. Twist the throttle a few times to prime.
69. Gentlemen, Start your engines.
70. Let the engine warm up and set the idle at 1100 – 1200 RPMs.
71. Remount the side covers.
72. Remount the seat.

That’s it. Time for a test ride.
The ride IS the adventure. The destination is just to get gas!
Reply | Threaded
Open this post in threaded view
|

Re: DOHC carb cleaning procedure

seestheday
This post was updated on .
With pics on another forum: http://deuceswild.yuku.com/topic/903/Carb-Cleaning#.Tq7-XZsr2so

ALSO: DO NOT USE TOOTHPASTE TO POLISH YOUR NEEDLE SEATS

Especially if your bike is going to sit for a while after you cleaned the carbs.

Unless you are absolutely sure you can get all the toothpaste out.  When toothpaste dries, it becomes super sticky and your carbs will piss gas everywhere because your floats will be stuck.
1981 CB750K with 900 cams
90K KM's, rebuilt head, rebuilt carbs, upgraded valve stem seals

My wife's recipe website that I'm trying to help promote: Strawberries for supper. Yes, I am a lucky man.

My cb750 video site
Reply | Threaded
Open this post in threaded view
|

Re: DOHC carb cleaning procedure

seestheday
This post was updated on .
Word doc I made for easy printing of the post I linked to that includes images for the CB900 Carb Rebuild

900_Carbs_Rebuild.doc

Another great resource: http://www.google.com/url?sa=t&source=web&cd=1&ved=0CBoQFjAA&url=http%3A%2F%2Fwww.cb750c.com%2Fpublicdocs%2FSeanG%2FHonda_Carb_Manual_revE.pdf&rct=j&q=macgregor%20carb%20cleaning%20honda_carb_manual_revE.pdf&ei=9q2JToOwNIPegQe5wZz6Cg&usg=AFQjCNEmSmzw9aIam2qmA7UAwPZ309Y5Jg&sig2=A2e2jvA9r9A4UvfIISOENQ&cad=rja
1981 CB750K with 900 cams
90K KM's, rebuilt head, rebuilt carbs, upgraded valve stem seals

My wife's recipe website that I'm trying to help promote: Strawberries for supper. Yes, I am a lucky man.

My cb750 video site
Reply | Threaded
Open this post in threaded view
|

Re: DOHC carb cleaning procedure

Lucky 1
In reply to this post by Re-run
The accelerator pump check balls were completely skipped.
Refer to this article by me on another forum if you want your carbs to work at all.
http://forums.sohc4.net/index.php?topic=94278.50
On a Roadstar Adventure.
Reply | Threaded
Open this post in threaded view
|

Re: DOHC carb cleaning procedure

seestheday
Thank you Donald, genuinely appreciate the help.  I'll check that out.
1981 CB750K with 900 cams
90K KM's, rebuilt head, rebuilt carbs, upgraded valve stem seals

My wife's recipe website that I'm trying to help promote: Strawberries for supper. Yes, I am a lucky man.

My cb750 video site
Reply | Threaded
Open this post in threaded view
|

Re: DOHC carb cleaning procedure

seestheday
In reply to this post by Lucky 1
Hi Donald,
I looked and I can't find the ball bearing you're referring to in your post on that other forum.
Is it possible that your carbs are different than mine?
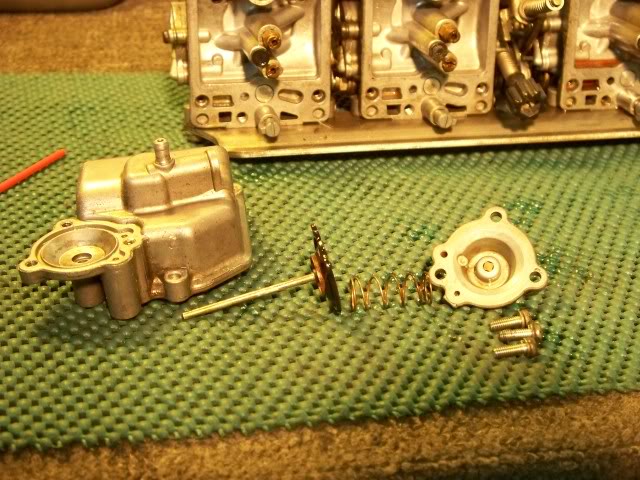
I have an 81 CB750K (DOHC).  My accelerator pump looks like this:


There is a long rod attached to the diaphragm which runs through the bowl and up into the bank of carbs.

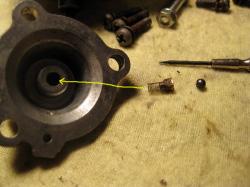
In the pic on your post it appears that there is a small screw and this steel ball that you're referring to where I have the long rod:


Do I have that right or am I missing something?
1981 CB750K with 900 cams
90K KM's, rebuilt head, rebuilt carbs, upgraded valve stem seals

My wife's recipe website that I'm trying to help promote: Strawberries for supper. Yes, I am a lucky man.

My cb750 video site
Reply | Threaded
Open this post in threaded view
|

Re: DOHC carb cleaning procedure

TOOLS1
Administrator
The little balls are under the little plastic plugs. One is right in the center of the cover, and the other one is on the edge of the float bowel. I remove them by  drilling a very small hole in them with a cutting torch tip cleaner (the kind that uses drill bits), and screwing a No#4 wood screw into them to make a handle. then wiggle them out. It helps if, you file a little off the tip of the screw. Also the little balls are tiny, and there are two equally small springs behind the tiny balls. Did I mention the balls are TINY?
TOOLS
P.S. You should be able to blow/suck air one way through the passage, and not both ways. If, you can do this, you will not need to take them apart.
Life is not about the number of breaths, you take, but the moments that take your breath away.
I don't have an anger problem. I have an idiot problem. Hank Hill
Never confuse education for intelligence.
Happiness is a belt fed weapon.
I just can't imagine what could go wrong.
No fire? No explosions? So whats the point of your story?
Those who are too smart to engage in politics are punished by being governed by those who are dumber. ~Plato
It couldn't be done, but the darn fool didn't know it, and did it anyway.
We all got problems. Ksharp
I like vintage bikes because they take me away from the clutter of technology that I work with everyday and back to a simpler time of mechanical elegance and simplicity.. "ninadm"
Darkwing Duck: The worst part of public transportation is the Public.
"That is awesome shit there" Re-Run
"Fear nothing, attack everything" Eric Berry
" Oh, you read that on the internet? Clearly it IS a massive problem. Of course it CAN’t be normal operation."

1976 CB 750-A X 2
1977 CB 750-A X 4
1977 CB 750-K
1976 CB 750 F
1981 CB 750
1966 Kawasaki SG 250
1981 KZ 750 LTD
1973 CB 350
1979 CM 185 Twinstar
1982 Honda XL 80
South of Eden (Kansas City MO)
Reply | Threaded
Open this post in threaded view
|

Re: DOHC carb cleaning procedure

seestheday
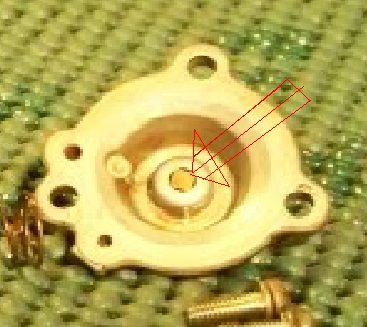
Is this little square thing on the accelerator pump cover what you mean by a plastic plug?

1981 CB750K with 900 cams
90K KM's, rebuilt head, rebuilt carbs, upgraded valve stem seals

My wife's recipe website that I'm trying to help promote: Strawberries for supper. Yes, I am a lucky man.

My cb750 video site
Reply | Threaded
Open this post in threaded view
|

Re: DOHC carb cleaning procedure

TOOLS1
Administrator
Yes that is it, and there is another one on the float bowel. Have I mentioned that the balls, and springs are tiny?
TOOLS
Life is not about the number of breaths, you take, but the moments that take your breath away.
I don't have an anger problem. I have an idiot problem. Hank Hill
Never confuse education for intelligence.
Happiness is a belt fed weapon.
I just can't imagine what could go wrong.
No fire? No explosions? So whats the point of your story?
Those who are too smart to engage in politics are punished by being governed by those who are dumber. ~Plato
It couldn't be done, but the darn fool didn't know it, and did it anyway.
We all got problems. Ksharp
I like vintage bikes because they take me away from the clutter of technology that I work with everyday and back to a simpler time of mechanical elegance and simplicity.. "ninadm"
Darkwing Duck: The worst part of public transportation is the Public.
"That is awesome shit there" Re-Run
"Fear nothing, attack everything" Eric Berry
" Oh, you read that on the internet? Clearly it IS a massive problem. Of course it CAN’t be normal operation."

1976 CB 750-A X 2
1977 CB 750-A X 4
1977 CB 750-K
1976 CB 750 F
1981 CB 750
1966 Kawasaki SG 250
1981 KZ 750 LTD
1973 CB 350
1979 CM 185 Twinstar
1982 Honda XL 80
South of Eden (Kansas City MO)
Reply | Threaded
Open this post in threaded view
|

Re: DOHC carb cleaning procedure

seestheday
Thanks,
Ha, yes I'm hoping that I don't have to touch them because I'm not looking forward to working with tiny delicate parts.
Sent from my BlackBerry device on the Rogers Wireless Network

From: "TOOLS1 [via Honda CB750'S]" <[hidden email]>
Date: Mon, 7 Nov 2011 08:35:07 -0800 (PST)
To: seestheday<[hidden email]>
Subject: Re: DOHC carb cleaning procedure

Yes that is it, and there is another one on the float bowel. Have I mentioned that the balls, and springs are tiny?
TOOLS
Life is not about the number of breaths, you take, but the moments that take your breath away.
I don't have an anger problem. I have an idiot problem. Hank Hill
Never confuse education for intelligence.
Happiness is a belt fed weapon.
I just can't imagine what could go wrong.
No fire? No explosions? So whats the point of your story?
Those who are too smart to engage in politics are punished by being governed by those who are dumber. ~Plato
1976 CB 750-A X 2
1977 CB 750 A
1981 CB 750
1995 KZ 1000 P-14
1981 KZ 750
1979 CM 185 Twinstar
1987 Honda TLR 200
1982 Honda XL 80
2005 Yamaha PW 50
South of Edan (Kansas City MO)


If you reply to this email, your message will be added to the discussion below:
http://honda-cb750-s.456789.n3.nabble.com/DOHC-carb-cleaning-procedure-tp867809p3487489.html
To unsubscribe from DOHC carb cleaning procedure, click here.
1981 CB750K with 900 cams
90K KM's, rebuilt head, rebuilt carbs, upgraded valve stem seals

My wife's recipe website that I'm trying to help promote: Strawberries for supper. Yes, I am a lucky man.

My cb750 video site
Reply | Threaded
Open this post in threaded view
|

Re: DOHC carb cleaning procedure

Lucky 1
There are two of those balls. One is in the top edge of the float bowl.
That one does not usually fail.

The one in the very bottom is the problem because all the junk ends up down there.
To get the plug out ,which is plastic or brass can be done by just using a very small screw driver and gently prying around it. as soon as it comes up a little you can pull it out with needle nose pliers.

Clean it and put it back together.
Make sure you remove the rubber hoses between the carbs and spray carb cleaner through each port  to nozzle to make sure it is clear.
PROTECT YOUR EYES!!
Next - test the pump by filling the carb float bowls with gas and actuating the throttle to see if the spray nozzles will work.
It may take a few tries.

If it just won't work check the other check ball in the top edge of the float bowl, and if it still won't work you will have to buy a new bottom plate WITH check ball. I think what happens is the bottom check ball can get corrosion and leak.

A new bottom plate with check ball cost me $85.00!! But it worked as soon as I installed it.
At least it was still available.


On a Roadstar Adventure.
Reply | Threaded
Open this post in threaded view
|

Re: DOHC carb cleaning procedure

Lucky 1
In reply to this post by seestheday
To be a mechanic you WILL have to learn to work with small delicate parts.
You do not get to choose only parts that you like that are simple.

You will have to get INVOLVED and commit yourself.
It is not a Matrix kind of deal where one of the other team members comes and does it FOR you.

I don't want to be TOO HARD ON YOU!! LOl...lol..lol
And wipe that silly smile off SEESTHEDAY!! LOL...lol..lol


On a Roadstar Adventure.
Reply | Threaded
Open this post in threaded view
|

Re: DOHC carb cleaning procedure

shinyribs
Administrator
Yep,I learned that when i tore my switch gear apart to polish the housings.There is all kinds of little springs,clips and wire retainers in those little bitty housings.Gotta take the easy with the hard.The harder tasks are more rewarding when they are done,though.
Reply | Threaded
Open this post in threaded view
|

Re: DOHC carb cleaning procedure

Lucky 1
Yes those are worse.
Need to place the mess over a towel so when parts come out they fall on the towel and stop flying around.
On a Roadstar Adventure.
Reply | Threaded
Open this post in threaded view
|

Re: DOHC carb cleaning procedure

shinyribs
Administrator
Lol  Over a towel and under a net!I had quite a search going for awhile looking for a rogue spring out of the kill switch.I think next time i will get in the bath tub,drain stopper in and curtain drawn tight!
Reply | Threaded
Open this post in threaded view
|

Re: DOHC carb cleaning procedure

Lucky 1
"Remember:Computers are fun...but you can't download a finished bike."

You CAN download a finished bike, but you just cannot ride it.  LOL
On a Roadstar Adventure.
Reply | Threaded
Open this post in threaded view
|

Re: DOHC carb cleaning procedure

Lucky 1
In reply to this post by Re-run
All machines, Airplanes ,trains, cars, motorcycles, all have the parts configured as if you are standing behind the machine looking forward.

All bearing and seals should have the numbers facing the mechanic.

On a Roadstar Adventure.
Reply | Threaded
Open this post in threaded view
|

Re: DOHC carb cleaning procedure

shinyribs
Administrator
In reply to this post by Lucky 1
donald branscom wrote
"Remember:Computers are fun...but you can't download a finished bike."

You CAN download a finished bike, but you just cannot ride it.  LOL


Reply | Threaded
Open this post in threaded view
|

Re: DOHC carb cleaning procedure

Half-Caf
In reply to this post by seestheday
seestheday wrote
Word doc I made for easy printing of the post I linked to that includes images for the CB900 Carb Rebuild

900_Carbs_Rebuild.doc
Thanks a lot for putting these together! I can tell that you put a lot of work into documenting things and I know that I am at least 1 person who will benefit from it.
The best things in life are custom
Youtube: http://www.youtube.com/user/halfscb
1980 cb750f SS
Chicago, IL
Reply | Threaded
Open this post in threaded view
|

Re: DOHC carb cleaning procedure

seestheday
Thanks, but the majority of the credit shouldn't go to me. I just brought together some stuff that was on the internet already.

I'll put credit in that word doc to ensure there isn't other confusion.
Sent from my BlackBerry device on the Rogers Wireless Network

From: "Half-Caf [via Honda CB750'S]" <[hidden email]>
Date: Wed, 16 Nov 2011 17:02:31 -0800 (PST)
To: seestheday<[hidden email]>
Subject: Re: DOHC carb cleaning procedure

seestheday wrote
Word doc I made for easy printing of the post I linked to that includes images for the CB900 Carb Rebuild

900_Carbs_Rebuild.doc
Thanks a lot for putting these together! I can tell that you put a lot of work into documenting things and I know that I am at least 1 person who will benefit from it.
Chicago, IL
1980 cb750f SS


If you reply to this email, your message will be added to the discussion below:
http://honda-cb750-s.456789.n3.nabble.com/DOHC-carb-cleaning-procedure-tp867809p3514444.html
To unsubscribe from DOHC carb cleaning procedure, click here.
NAML
1981 CB750K with 900 cams
90K KM's, rebuilt head, rebuilt carbs, upgraded valve stem seals

My wife's recipe website that I'm trying to help promote: Strawberries for supper. Yes, I am a lucky man.

My cb750 video site
12