|
|
1 ...
3456789
... 15
|
|
Lookin' good, Hoosier. Do you mind sharing the link for the rotor template? Sorry if you posted and I've missed it.
|
|
|
This post was updated on .
spacetiger wrote
A question; did you consider swapping discs to a bigger diameter? I think you might be able to do it and use factory parts. Do you know the diameter of the existing discs, 276mm?
Thank Jerry, Honestly I thought about upgrading the brake with a set of EBC rotors but with the C model having dual discs at 1127 sq cm of swept area compared to the K's single 611 sq cm I figured that was good enough. Yes they are the stock 276mm, measured just under 11 inches
Rich Ard wrote
Lookin' good, Hoosier. Do you mind sharing the link for the rotor template? Sorry if you posted and I've missed it.
Thanks Rich. I found referance and templates on DTT, and SOHC4.net but wound up designing my own based on theirs since I can not print to size... 8 1/2 x 11 doesn't cut it. This is probably the best link for those who have never done it that I found.
http://www.xs11.com/xs11-info/tech-tips/modifications/brakes/197-drilled-brake-rotors-how-to.html
81 Honda CB750C - Current Project
67 BSA Spitfire MkIII - Next Up (Full Resto)
81 Honda GL1100 - Bob / Cafe´
80 Suzuki GS750L - Bratstyle
72 Honda CB450K5 - Basket Case
73 Honda CB350F Cafe' (Gone but not forgotten)
Don't wait for opportunity to knock... kick the door down and drag the old harlot in!
|
|
|
Spent some Quality time out in the shop over the long holiday weekend.
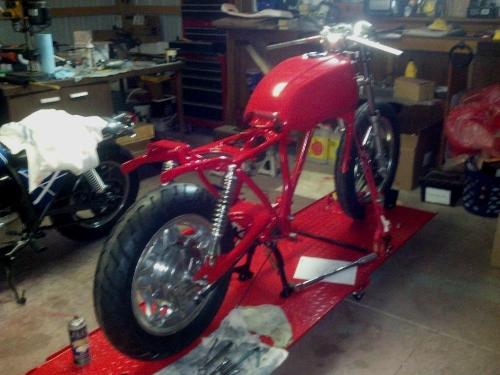
epoxy coated the side and center stands, cleaned up all the hardware and got them mounted. This let me actually get her down on both wheels for the first time in who knows how long since I brought her home in boxes.
My Drag bars came in and I could actually push her around as a roller and loaded it onto the new lift. Took the tank down and set it in place to stand back and stare for a bit.
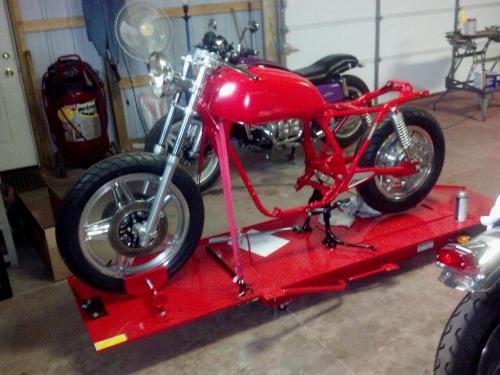 It was nice to be able to raise it up and worked on cleaning, polishing, and installing the rear brake linkage. I have stripped the PO's black paint job off the oil pan and been polishing it, picked up the gaskets for it and all the side covers.... So I should be able to focus on the engine for a while next.
E-bayed a few odd bits and expect to see them start tricklng in soon.
81 Honda CB750C - Current Project
67 BSA Spitfire MkIII - Next Up (Full Resto)
81 Honda GL1100 - Bob / Cafe´
80 Suzuki GS750L - Bratstyle
72 Honda CB450K5 - Basket Case
73 Honda CB350F Cafe' (Gone but not forgotten)
Don't wait for opportunity to knock... kick the door down and drag the old harlot in!
|
|
Banned User
|
CONTENTS DELETED
The author has deleted this message.
|
|
|
Thanks alpha. Those are the cheapest OEM Showa 79-82 CB750 shocks I could find on e-bay that showed a good picture of the shafts. I got burned in the past buying a set that said "light pitting"... These cleaned up just fine. Although this set came without, if you get a pair with the shroud over the coils, you can usually remove it when you disassemble them to clean them up.
81 Honda CB750C - Current Project
67 BSA Spitfire MkIII - Next Up (Full Resto)
81 Honda GL1100 - Bob / Cafe´
80 Suzuki GS750L - Bratstyle
72 Honda CB450K5 - Basket Case
73 Honda CB350F Cafe' (Gone but not forgotten)
Don't wait for opportunity to knock... kick the door down and drag the old harlot in!
|
|
Administrator
|
I guess it takes all types. Myself,I love shrouded shocks. Looks beefy IMO. Nothing wrong withnaked springs either,they do look kinda light and sporty on your bike. Bike looks good bud. That one's gonna be real hard to miss going down the road! 
|
|
|
Latest received goods:
Valve cover sealing washers
New carb to head insulators (boots)
Stock air filter to run the OEM airbox
Chrome 3" round bar end mirrors
New headlamp trim ring and Mount to fit the OEM bucket
Next major purchase will be the still needed Carb O/H kit(s). Most likely going with the Randakks kit. I used his Master O/H kit on the GL1100 Keihins and am sold on the quality of his materials. Even though the price may seem high, once you compare the contents of other kits, price the additional items that are already included in Randakks, then multiply times 4, you can appreciate this kits complete parts count of the contents for the price.
http://www.randakks.com/DOHC%20Four%20Page.htm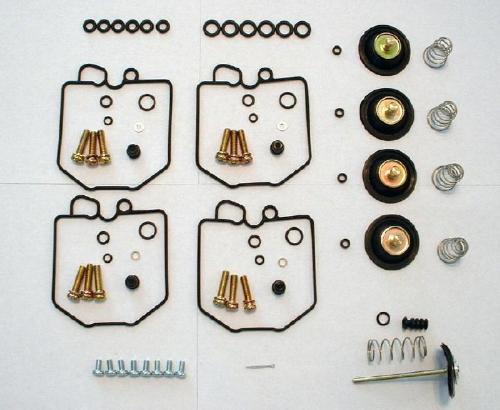
81 Honda CB750C - Current Project
67 BSA Spitfire MkIII - Next Up (Full Resto)
81 Honda GL1100 - Bob / Cafe´
80 Suzuki GS750L - Bratstyle
72 Honda CB450K5 - Basket Case
73 Honda CB350F Cafe' (Gone but not forgotten)
Don't wait for opportunity to knock... kick the door down and drag the old harlot in!
|
|
|
This post was updated on .
Damn... double post
- deleted -
81 Honda CB750C - Current Project
67 BSA Spitfire MkIII - Next Up (Full Resto)
81 Honda GL1100 - Bob / Cafe´
80 Suzuki GS750L - Bratstyle
72 Honda CB450K5 - Basket Case
73 Honda CB350F Cafe' (Gone but not forgotten)
Don't wait for opportunity to knock... kick the door down and drag the old harlot in!
|
|
Banned User
|
CONTENTS DELETED
The author has deleted this message.
|
|
|
Ditto on randakks kit. I bought another kit and the qualitybwas good, but it didn't come with everything I needed. I ended up having to get it all myself. It would have been much better just to have bought the whole kit up front.
Question though, what is that small pin in the bottom center of the pic?
1981 CB750K with 900 cams
90K KM's, rebuilt head, rebuilt carbs, upgraded valve stem seals
My wife's recipe website that I'm trying to help promote: Strawberries for supper. Yes, I am a lucky man.
|
|
|
seestheday wrote
Question though, what is that small pin in the bottom center of the pic?
Randakk says...
1 mm cotter pin for accelerator pump linkage - 1 supplied (simple item, but hard to find elsewhere)
81 Honda CB750C - Current Project
67 BSA Spitfire MkIII - Next Up (Full Resto)
81 Honda GL1100 - Bob / Cafe´
80 Suzuki GS750L - Bratstyle
72 Honda CB450K5 - Basket Case
73 Honda CB350F Cafe' (Gone but not forgotten)
Don't wait for opportunity to knock... kick the door down and drag the old harlot in!
|
|
|
Interesting. Any pics of where it is supposed to go? I don't recall seeing one and I just rebuilt my carbs. Sent from my BlackBerry device From: Hoosier Daddy [via Honda CB750'S]
Sent: Friday, January 4, 2013 7:33 PM
To: seestheday
Subject: Re: '81 CB750C "Rock-It"
|
seestheday wrote
Question though, what is that small pin in the bottom center of the pic?
Randakk says...
1 mm cotter pin for accelerator pump linkage - 1 supplied (simple item, but hard to find elsewhere)
81 Honda CB750C - Current Project
67 BSA Spitfife MkIII - Next Up (Full Resto)
81 Honda GL1100 - Bob / Cafe´
80 Suzuki GS750L - Bratstyle
72 Honda CB450K5 - Basket Case
73 Honda CB350F Cafe' (Gone but not forgotten)
Don't wait for opportunity to knock... kick the door down and drag the old harlot in!
1981 CB750K with 900 cams
90K KM's, rebuilt head, rebuilt carbs, upgraded valve stem seals
My wife's recipe website that I'm trying to help promote: Strawberries for supper. Yes, I am a lucky man.
|
|
|
No pics yet, once I get knee deep into it I will and I'll be sure to post some.
Maybe it doesn't apply to all models. (?)
81 Honda CB750C - Current Project
67 BSA Spitfire MkIII - Next Up (Full Resto)
81 Honda GL1100 - Bob / Cafe´
80 Suzuki GS750L - Bratstyle
72 Honda CB450K5 - Basket Case
73 Honda CB350F Cafe' (Gone but not forgotten)
Don't wait for opportunity to knock... kick the door down and drag the old harlot in!
|
|
|
Hoosier Daddy wrote
No pics yet, once I get knee deep into it I will and I'll be sure to post some.
Maybe it doesn't apply to all models. (?)
 Just Hooter  Daddy models  your out of luck See's
1977 CB750 F2 Super Sport
<LET THOSE WHO RIDE DECIDE><RIDE TO LIVE-LIVE FOR JESUS>
Native American from central Cal, Kickstand UP in S.W.Missouri,
|
|
|
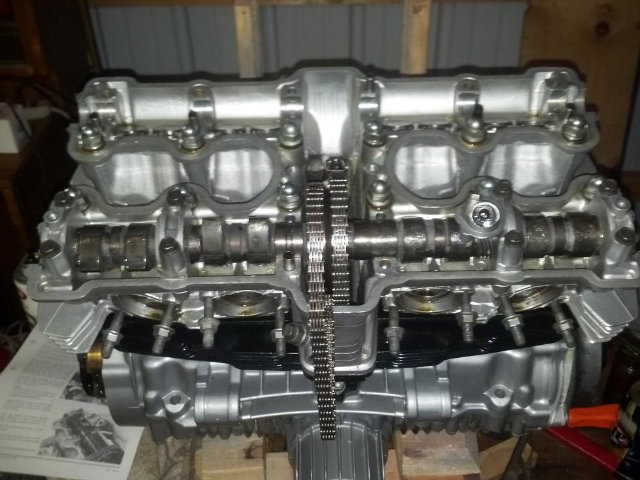
I have been trying to focus on the engine, figure once I get that reassembled and installed I can then take the side covers off an polish in my liesure while I am moving forward with the bike as a whole. After all I got 2 - 3 months before riding season arrives.  Started out Friday night with the head that I already had cleaned and the valves lapped and installed a while back.
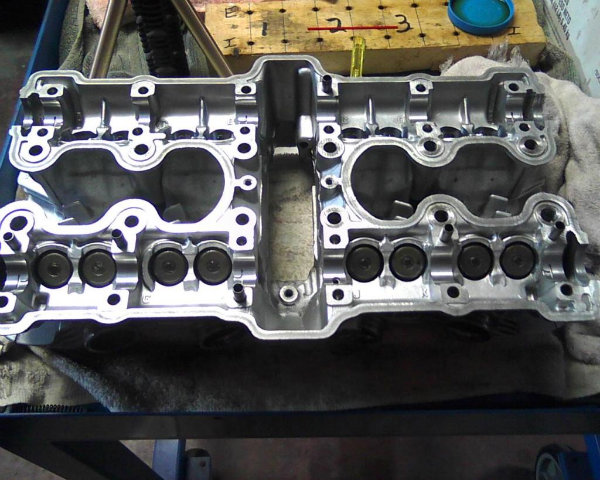 Clean, mic'ed, oiled and installed the sim and buckets. The PO had removed the cams when I got it so I have no idea what the valve clearences were. Plus even though it didn't take much, after lapping the valves in I am sure I changed it a little. So I used my micrometer to get the shim sizes of the ones that were not marked to populate this Valve shim worksheet base line measurements.
DOHC valve worksheet.xlsIf that one is too basic for you this one is the new version...
SeanG valve shim.xls I gave the mating surfaces a final wipe down, set the gasket in place and installed the head. Torqued in 3 stages to the final spec and then installed the front (exhaust) cam. Cleaning each piece to the point I was feeling a bit anal-retentive.
Here is where I left off last night and it sits at the moment. As soon as the shop warms up I'm heading back out to recheck my timing marks and then move to the rear (intake) cam.
81 Honda CB750C - Current Project
67 BSA Spitfire MkIII - Next Up (Full Resto)
81 Honda GL1100 - Bob / Cafe´
80 Suzuki GS750L - Bratstyle
72 Honda CB450K5 - Basket Case
73 Honda CB350F Cafe' (Gone but not forgotten)
Don't wait for opportunity to knock... kick the door down and drag the old harlot in!
|
|
|
Loving this build thread. We're pretty close in what we're doing, just doing things in a different order. Pretty sure you're overtaking me and that yours is going to turn out much prettier that mine though. I just finished a full carb rebuild. It would be really nice if my engine turns out as clean as yours but I'm not sure I have that kind of patience.
1981 CB750K with 900 cams
90K KM's, rebuilt head, rebuilt carbs, upgraded valve stem seals
My wife's recipe website that I'm trying to help promote: Strawberries for supper. Yes, I am a lucky man.
|
|
|
seestheday wrote
Question though, what is that small pin in the bottom center of the pic?
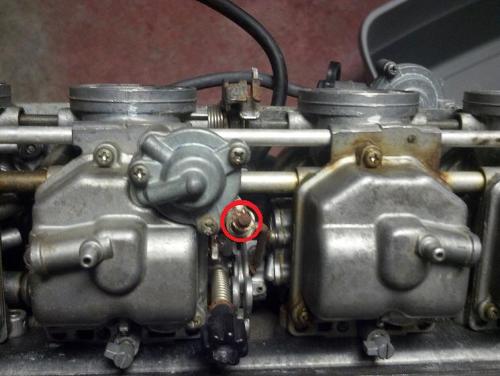
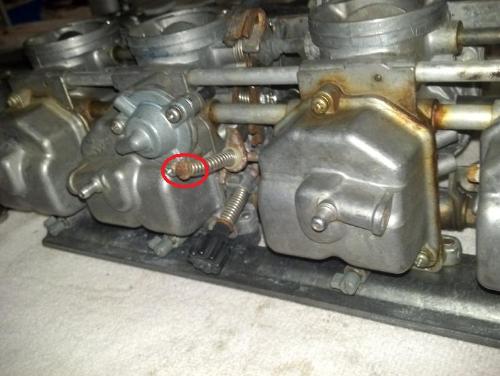
Dug out my carb rack, rolled it over and between 2 - 3 carbs found the cotter pin on the end of that linkage holdinding the washer that retains the spring... right next tho the idle speed adjustment knob. Hope these pics help.;
81 Honda CB750C - Current Project
67 BSA Spitfire MkIII - Next Up (Full Resto)
81 Honda GL1100 - Bob / Cafe´
80 Suzuki GS750L - Bratstyle
72 Honda CB450K5 - Basket Case
73 Honda CB350F Cafe' (Gone but not forgotten)
Don't wait for opportunity to knock... kick the door down and drag the old harlot in!
|
|
|
Hoosier Daddy wrote
I have been trying to focus on the engine, figure once I get that reassembled and installed I can then take the side covers off an polish in my liesure while I am moving forward with the bike as a whole. After all I got 2 - 3 months before riding season arrives.  Started out Friday night with the head that I already had cleaned and the valves lapped and installed a while back.
 Clean, mic'ed, oiled and installed the sim and buckets. The PO had removed the cams when I got it so I have no idea what the valve clearences were. Plus even though it didn't take much, after lapping the valves in I am sure I changed it a little. So I used my micrometer to get the shim sizes of the ones that were not marked to populate this Valve shim worksheet base line measurements.
DOHC valve worksheet.xlsIf that one is too basic for you this one is the new version...
SeanG valve shim.xls I gave the mating surfaces a final wipe down, set the gasket in place and installed the head. Torqued in 3 stages to the final spec and then installed the front (exhaust) cam. Cleaning each piece to the point I was feeling a bit anal-retentive.
Here is where I left off last night and it sits at the moment. As soon as the shop warms up I'm heading back out to recheck my timing marks and then move to the rear (intake) cam.

Wo! Needed sunglasses to look at that shiny new looking engine! 
78 CB750F3 Super Sport
Austin, TX
|
|
|
Thanks for looking into this. I'll check my carbs tonight. Sent from my BlackBerry device
seestheday wrote
Question though, what is that small pin in the bottom center of the pic?
Dug out my carb rack, rolled it over and between 2 - 3 carbs found the cotter pin on the end of that linkage holdinding the washer that retains the spring... right next tho the idle speed adjustment knob. Hope these pics help.;
 
81 Honda CB750C - Current Project
67 BSA Spitfife MkIII - Next Up (Full Resto)
81 Honda GL1100 - Bob / Cafe´
80 Suzuki GS750L - Bratstyle
72 Honda CB450K5 - Basket Case
73 Honda CB350F Cafe' (Gone but not forgotten)
Don't wait for opportunity to knock... kick the door down and drag the old harlot in!
1981 CB750K with 900 cams
90K KM's, rebuilt head, rebuilt carbs, upgraded valve stem seals
My wife's recipe website that I'm trying to help promote: Strawberries for supper. Yes, I am a lucky man.
|
|
|
Found it on my carbs. It's there but it's tiny and didn’t need to be disassembled for the clean which is why I didn't notice it before. Mine is also rust camouflaged.
Thanks for the help. Sent from my BlackBerry device
seestheday wrote
Question though, what is that small pin in the bottom center of the pic?
Dug out my carb rack, rolled it over and between 2 - 3 carbs found the cotter pin on the end of that linkage holdinding the washer that retains the spring... right next tho the idle speed adjustment knob. Hope these pics help.;
 
81 Honda CB750C - Current Project
67 BSA Spitfife MkIII - Next Up (Full Resto)
81 Honda GL1100 - Bob / Cafe´
80 Suzuki GS750L - Bratstyle
72 Honda CB450K5 - Basket Case
73 Honda CB350F Cafe' (Gone but not forgotten)
Don't wait for opportunity to knock... kick the door down and drag the old harlot in!
1981 CB750K with 900 cams
90K KM's, rebuilt head, rebuilt carbs, upgraded valve stem seals
My wife's recipe website that I'm trying to help promote: Strawberries for supper. Yes, I am a lucky man.
|
1 ...
3456789
... 15
|


 Just Hooter
  Daddy models
 your out of luck See's


